Document Templates
Document templates are ready-to-use blueprints for different types of documents such as agreements, invoices, and proposals etc. They can help streamline any process where you need to create the same or similar documents repeatedly. You can use a document template as is or can use it as the first draft for your document.
Document templates in ShareFile can automatically pull in values from other applications such as Salesforce and paste them into the document. They are also seamlessly integrated with ShareFile’s native e-signature capability.
Manually copy-pasting information into digital documents can be time consuming and prone to unintended human error. You can use a document template to send repetitive documents such as NDAs, engagement letters, and invoices, for signature quickly.
You can use ShareFile document templates for both Word and PDFs. For information on creating a document template, select the authoring tool you want to use:
Note:
- When creating a new document template, do not include personal health information (PHI) or other sensitive information in it.
Document templates can be applied to different types of digital documents. Some instances are listed below:
- Engagement letters to onboard new clients
- Employment offer letters to hire new employees
- Non-disclosure agreements
- Divorce settlement agreements
- State Tax Forms
- Rental and Lease agreements
- Budget approval proposals
- Statement of Work
- Purchase Orders
- Bills and Invoices
- Loan applications
- Bank account applications
- Joint Credit applications
Components of a document template
Document templates is made up of several key components. Use the following sections to learn about each component.
File
The base file for the template.
Roles
Each role represents a stakeholder or a party involved in the document signature process. You can assign fields to every role so that all the fields that need to be filled out by a specific stakeholder can be clubbed together. When someone uses a document template, they’ll be asked to provide the name and email address for each role.
For example, an offer letter to hire an employee is signed by human resources (HR) and the prospective employee. A document template for this use case will need 2 roles: HR and Prospective Employee. When sending this template for signature, the user provides an email address for human resources and the prospective client, who will both receive this signature request.
Variables
You can automatically fill or paste data from ShareFile and third party applications in documents. Variables are used to specify the source of this data and the type of data that you’re planning to automatically fill in the document.
For example, if you are using Salesforce to track your prospective clients or leads, create an engagement letter template in ShareFile to automatically fill or paste this information into the document when you send it out for signature. In this case, the source for the variable is Salesforce and the data type are leads.
Types of fields
While preparing a document template, you can add various fields to it that can either be filled at the time of document creation or can be filled by the signers of the document.
Two different types of fields can be added to document templates in ShareFile. They are available on the left pane of the “Create template” window and can easily be added to the template using drag and drop:
-
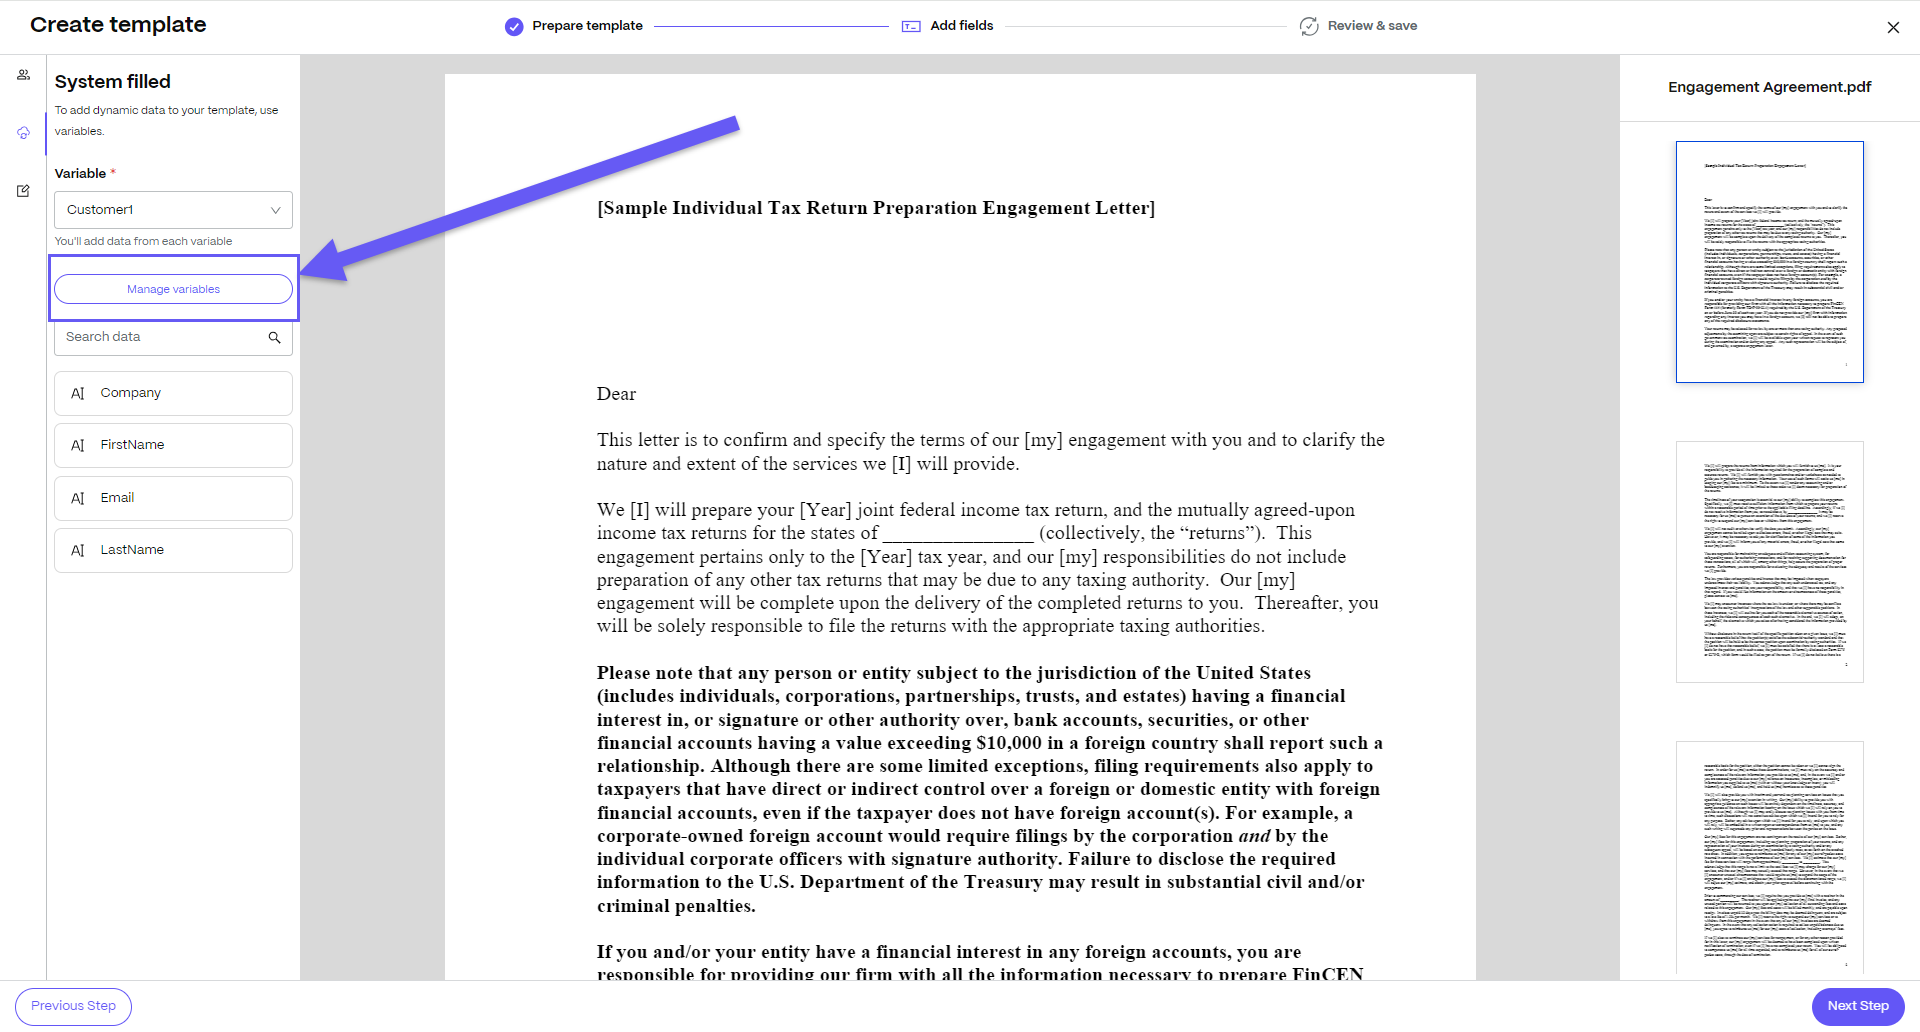
System-filled fields: Using these fields, you can automatically paste data to your document at the time of creation. This can be done with the help of variables. You can create new variables using the “Manage variables” button on the left pane as shown in the screen below.

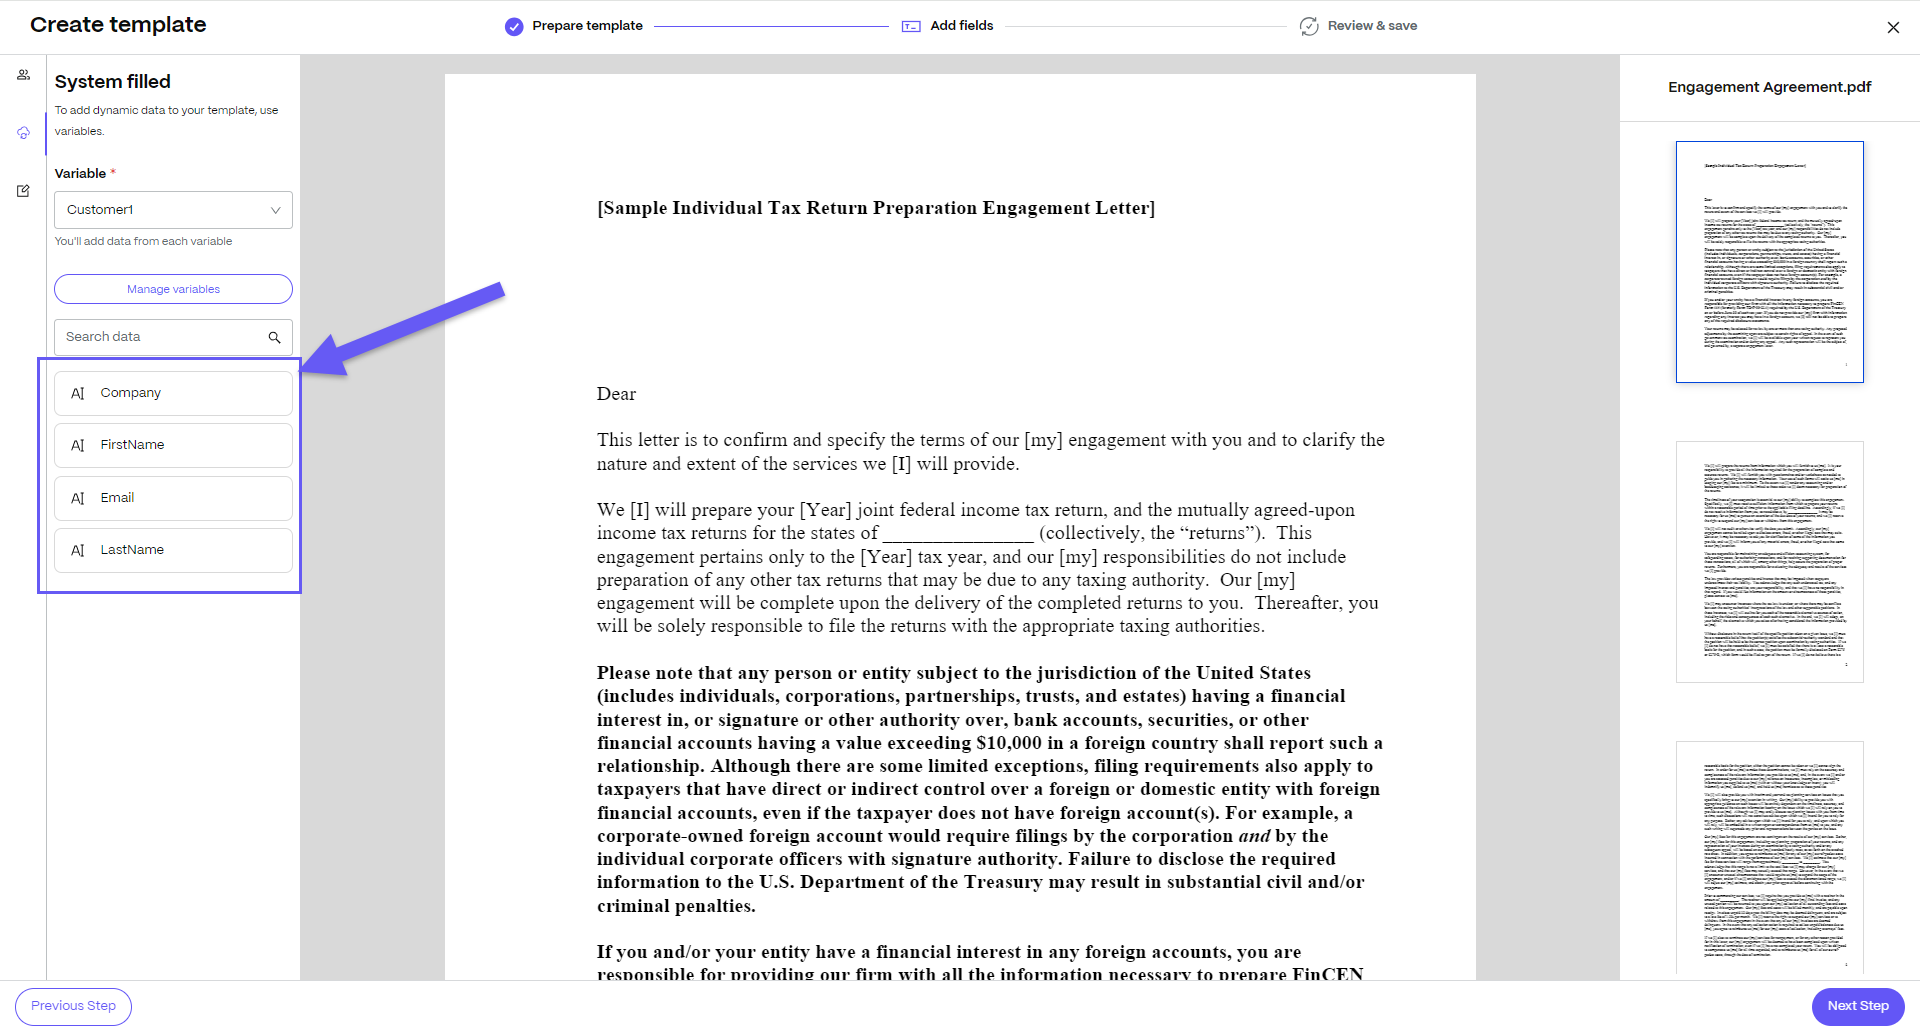
For example, in this Engagement Letter template, you can add data such as Email, Company, FirstName, and LastName from the left pane as shown below using the variable Customer1. These are automatically added to your document when you send it for signature to a client

-
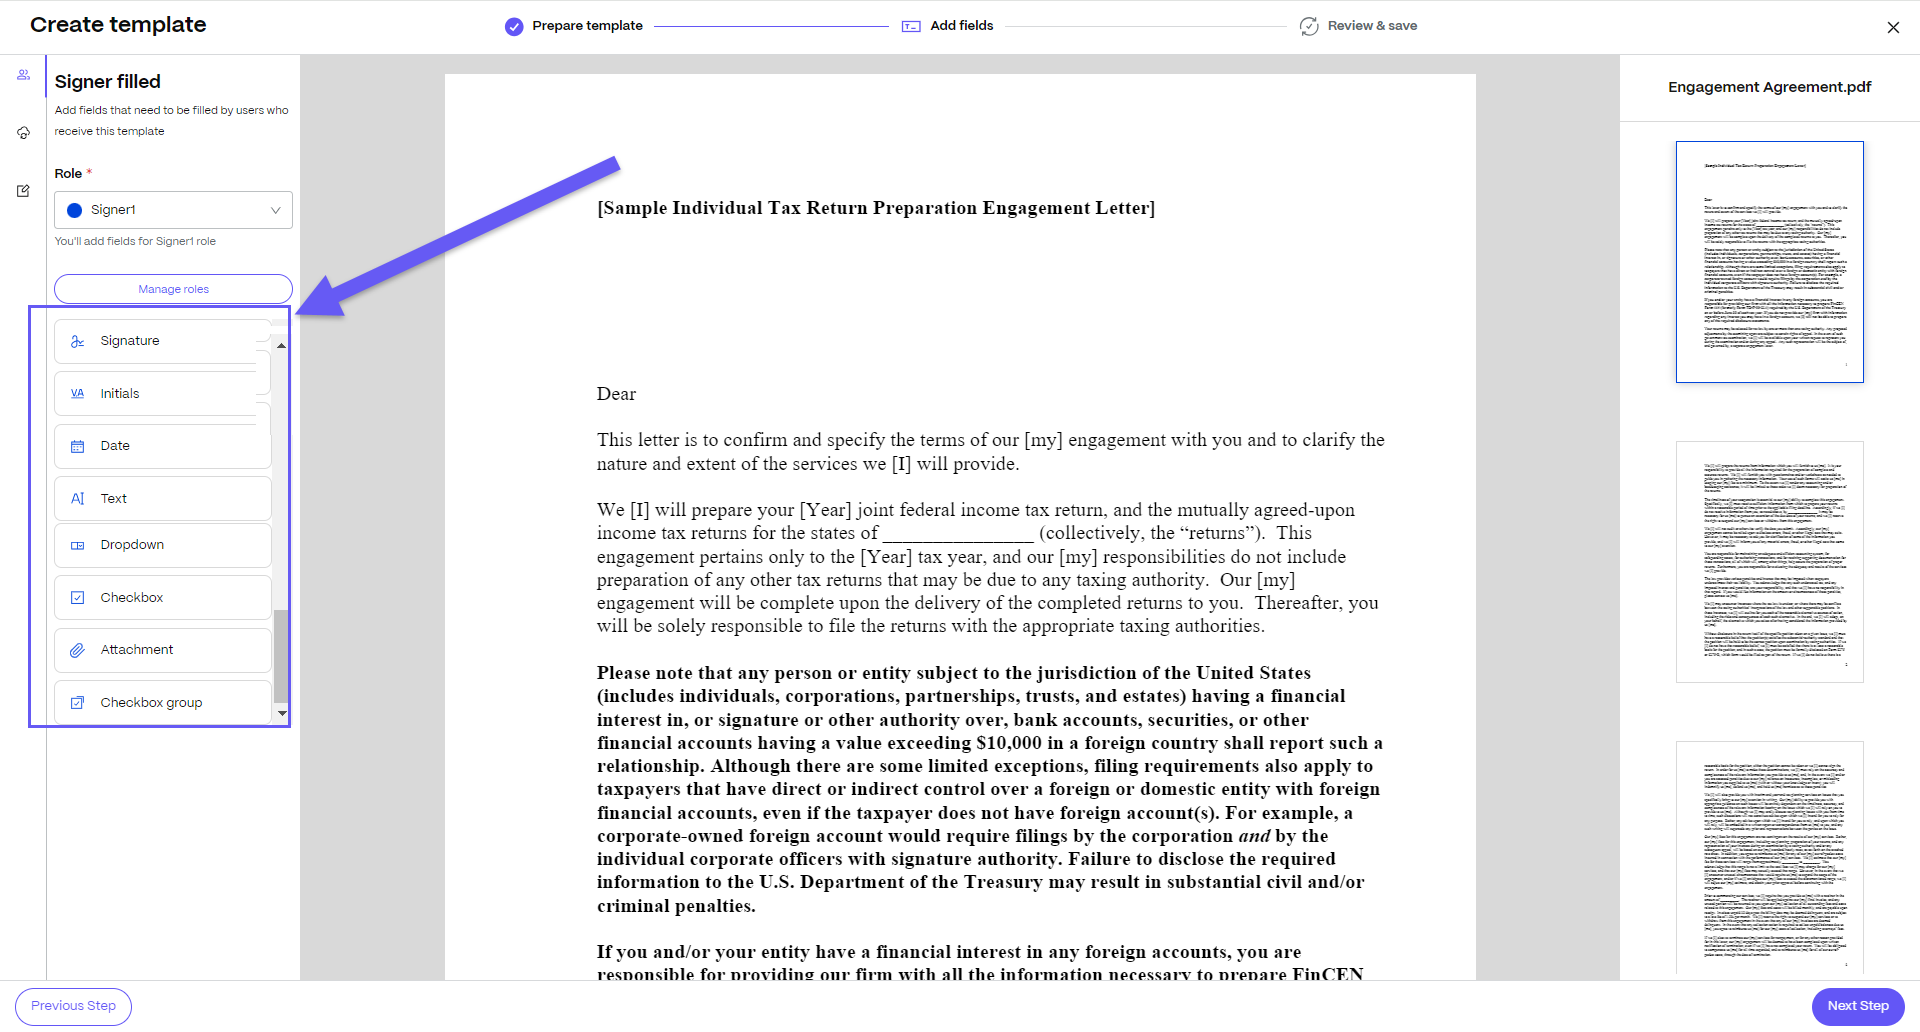
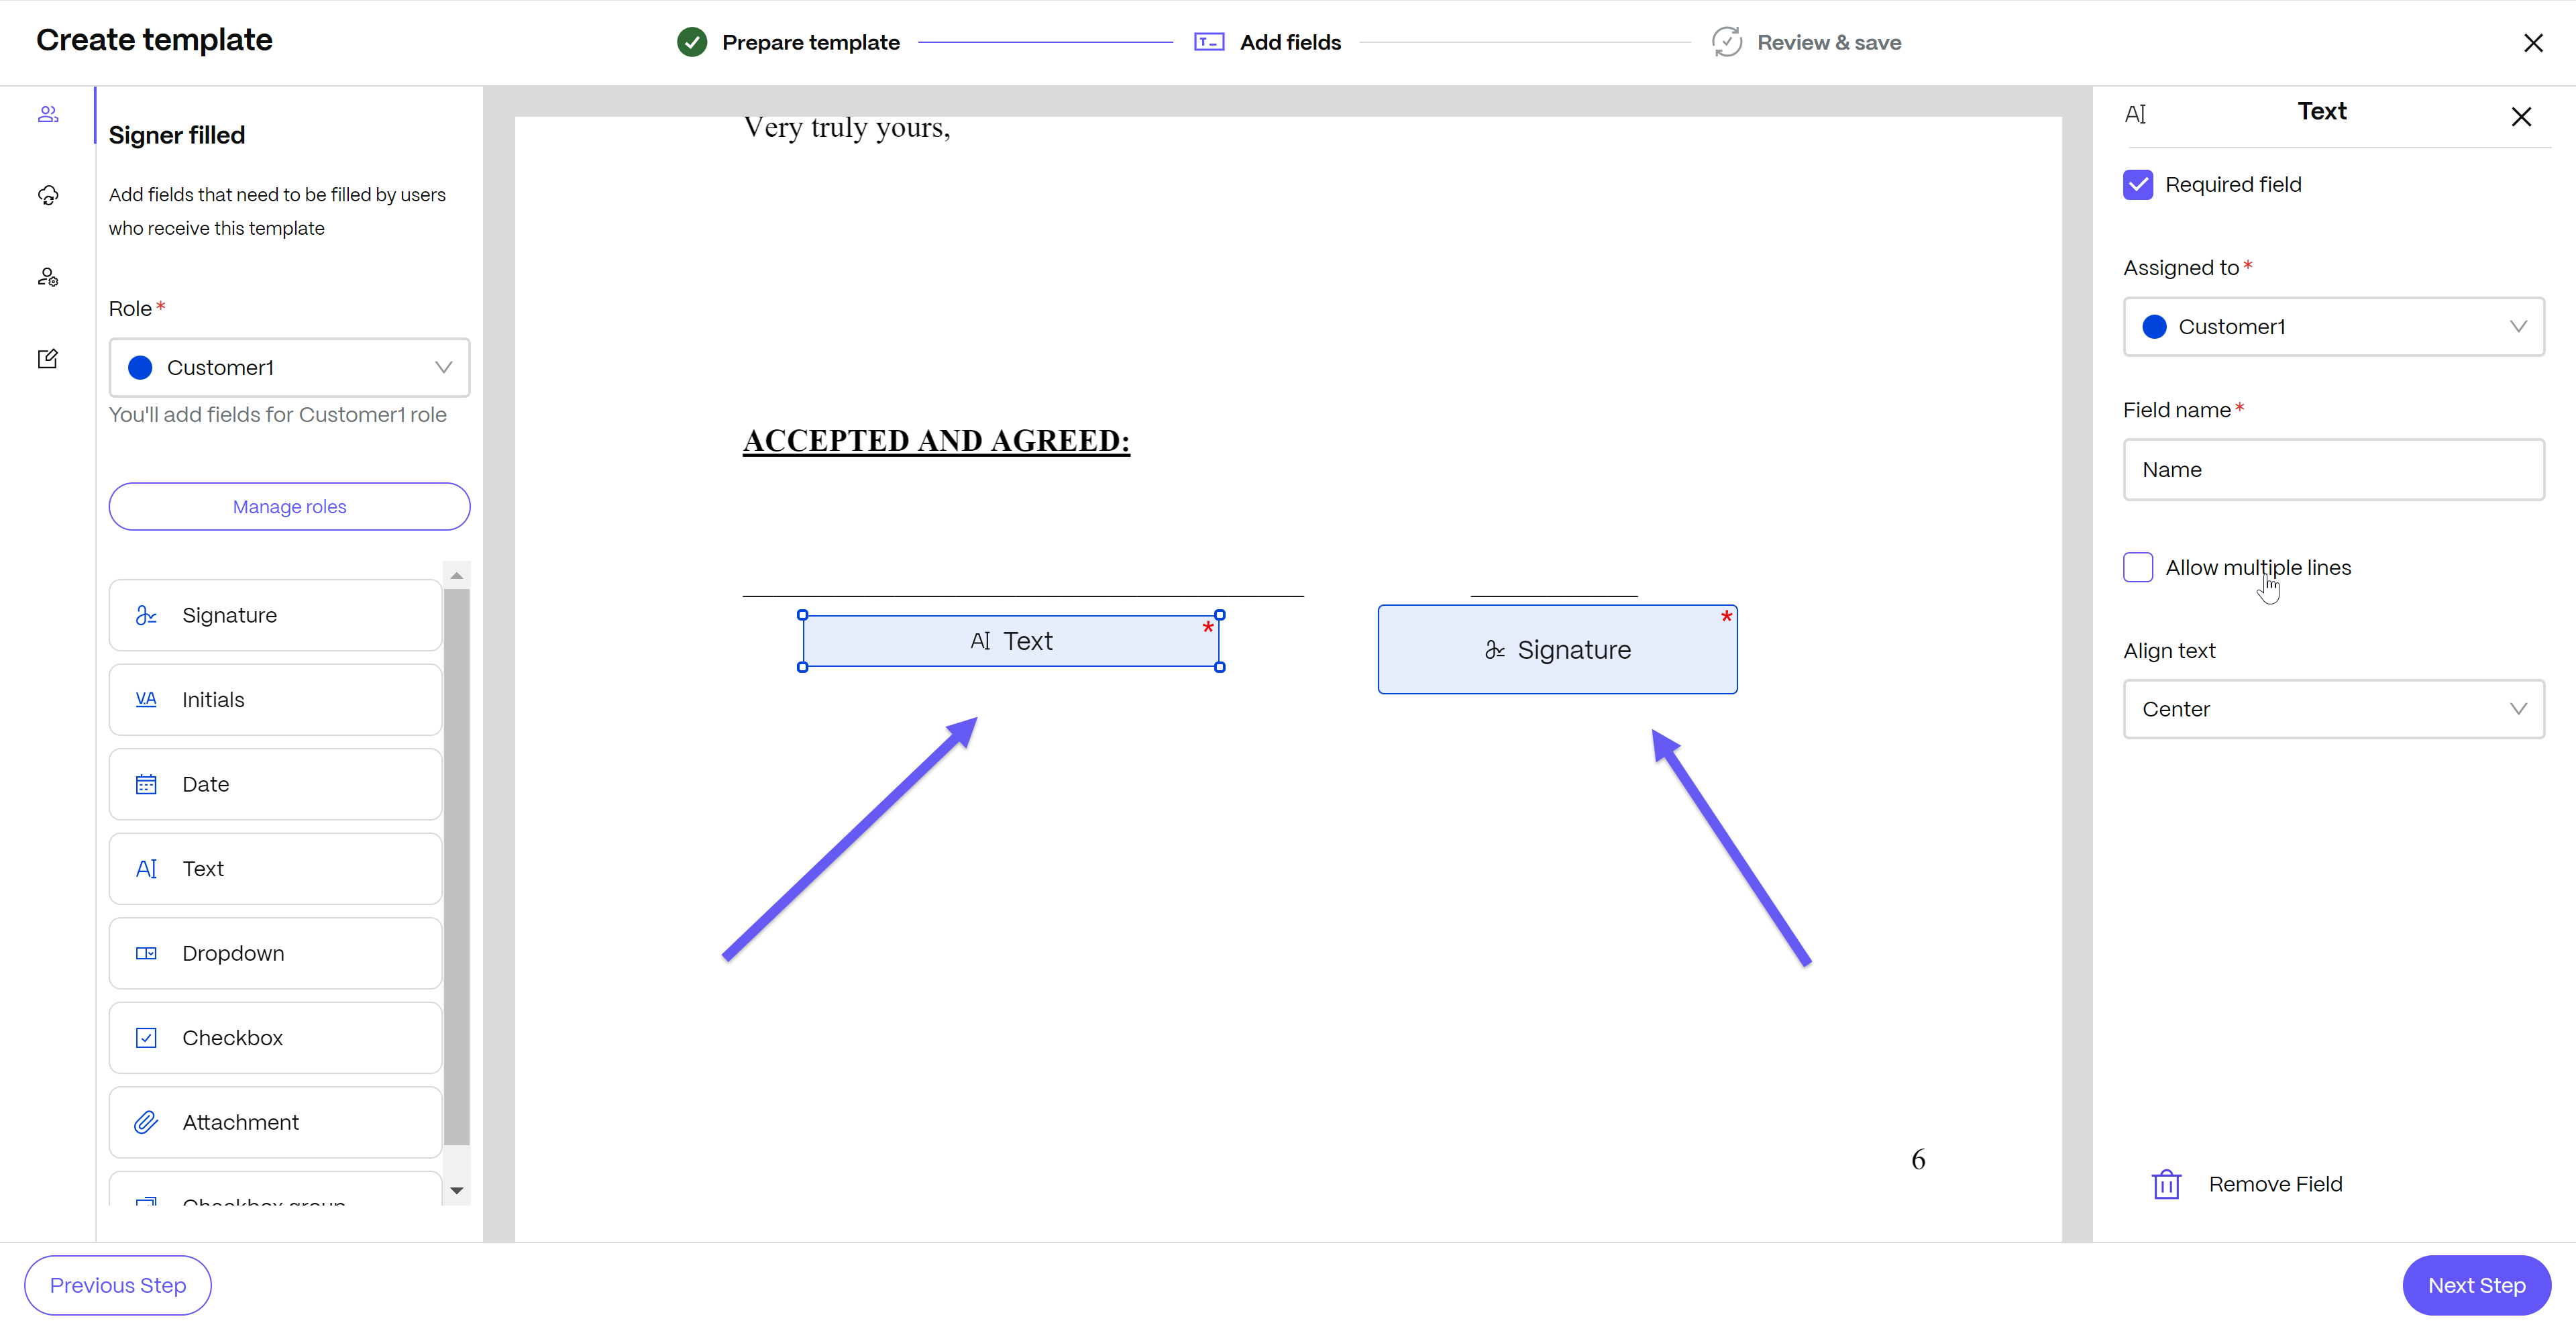
Signer fields: Using these fields, you can add fields that need to be filled by users who receive the document created from this template. Every signer field needs to be assigned to a role. We currently support the following types of signer fields:
-
Signature
-
Initials
-
Date
-
Text
-
Dropdown
-
Checkbox
-
Attachment
-
Checkbox group
Note:
When you set a checkbox group as required, the rule applies to the checkbox group as a whole. This doesn't make each checkbox item within the group also required.
- If you set the checkbox group rule to Select only one, the user must select one checkbox.
- If you set the checkbox group rule to Select one or more, the user must select at least one checkbox.
- If the user must select all the checkboxes in the template, use individual checkboxes rather than groups.

For example, in this Engagement Letter template, we’ve added a name and signature field that will be entered by the client.
-
-
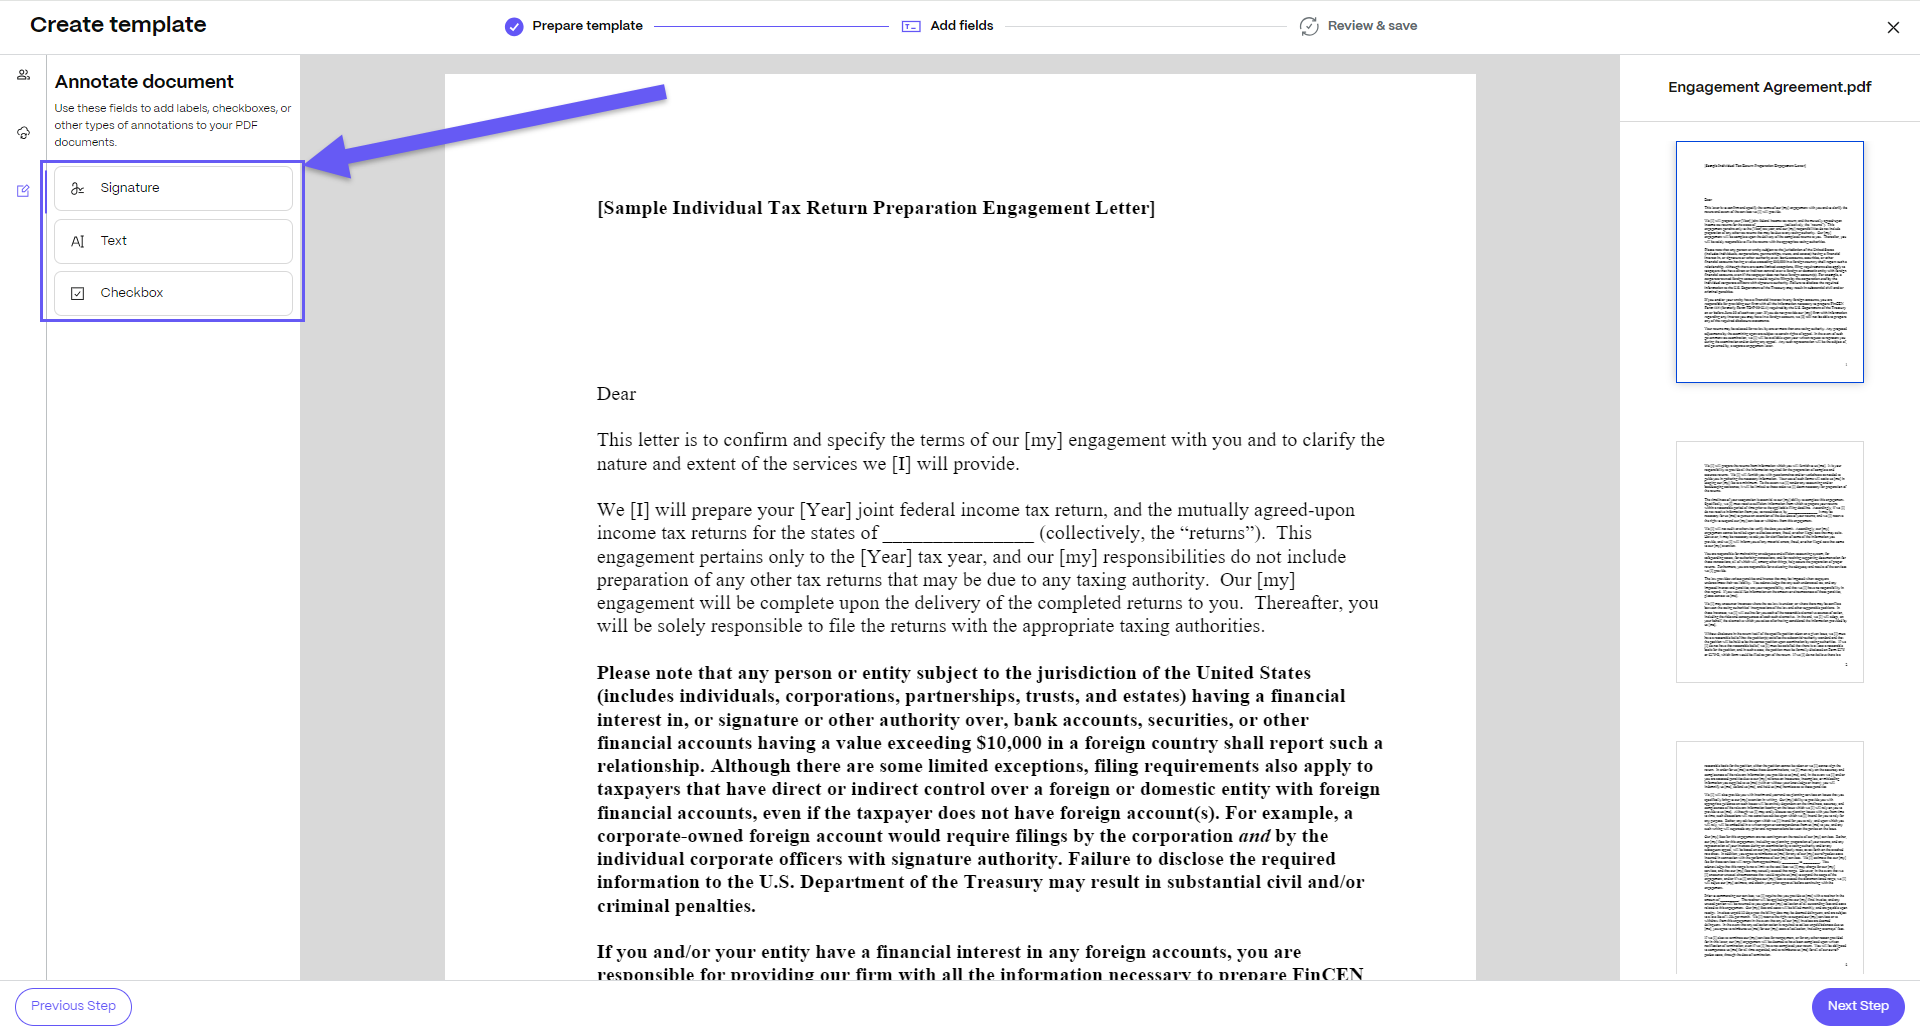
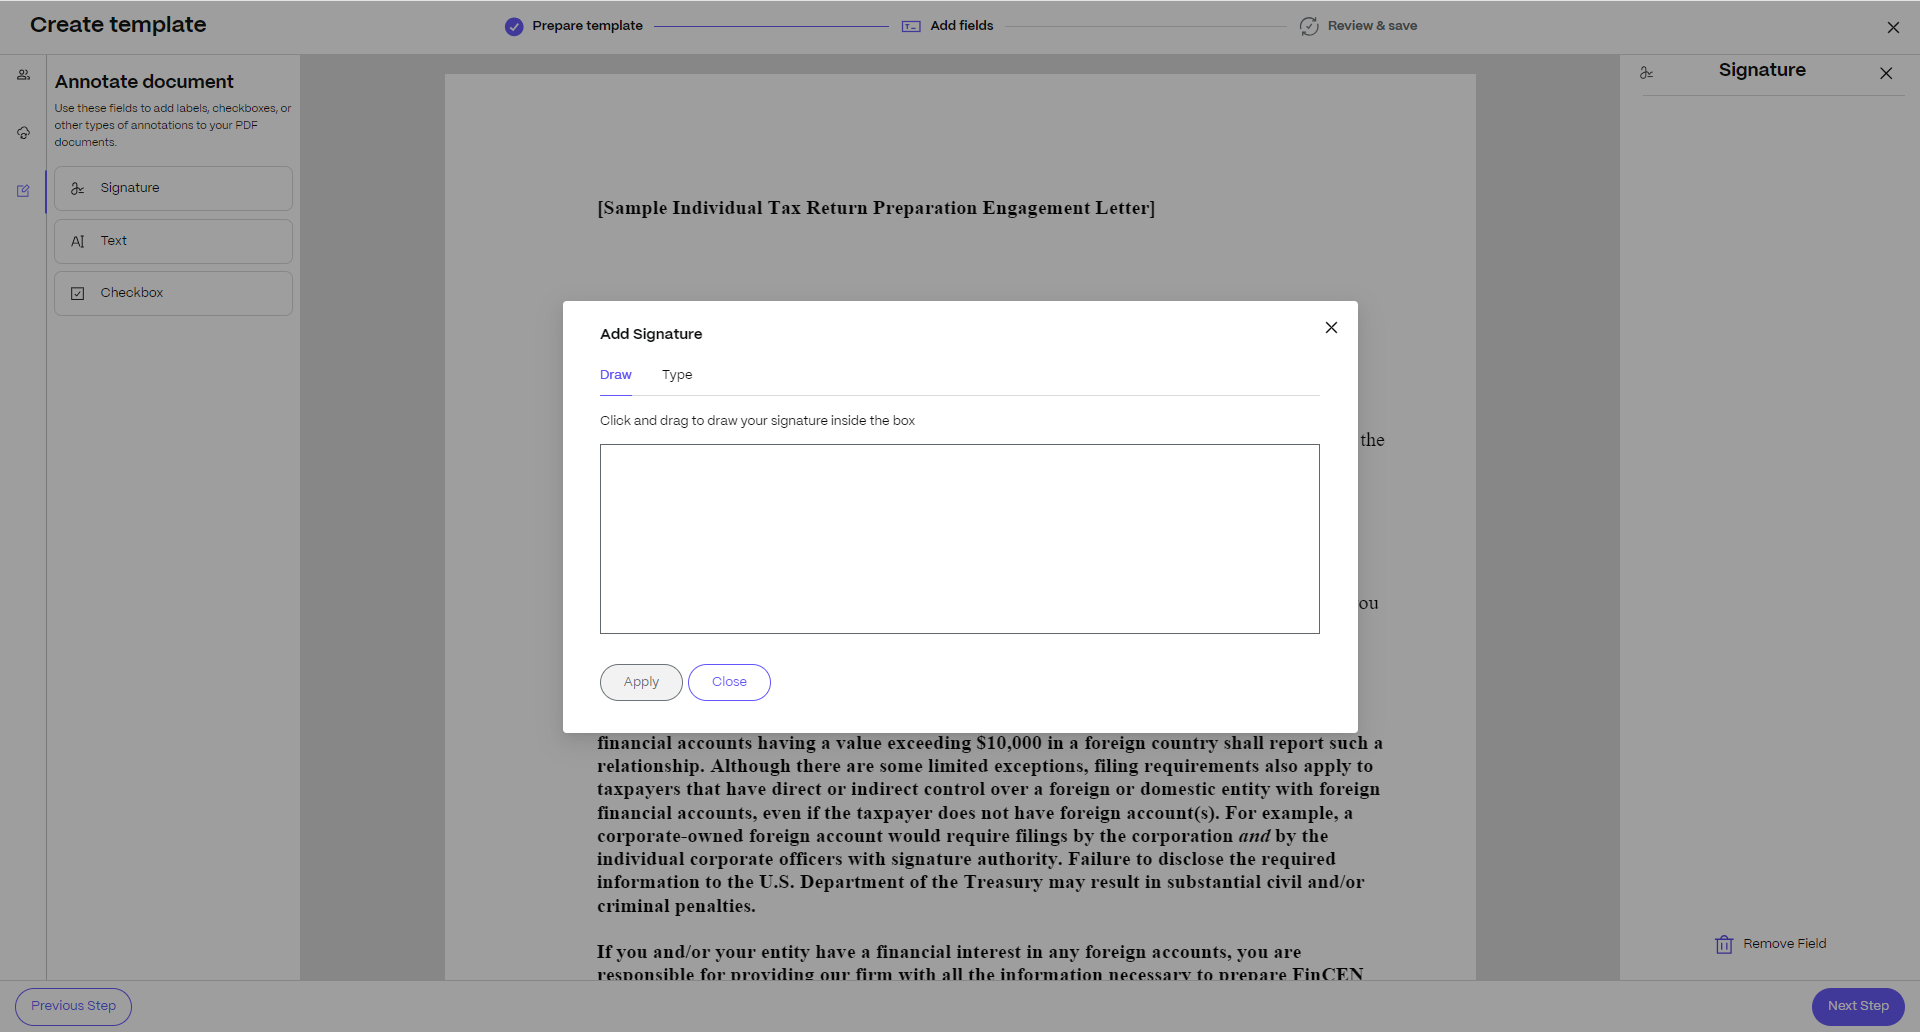
Annotations: Using annotations, you can add custom labels, checkboxes, or saved signatures to your PDF documents. We currently support the following types of annotations:
- Signature
- Text
- Checkbox

Note:
When you add an annotation of signature type to the document, the Add Signature popup window opens. You can either draw your signature or type your name. This will be added to the field position on the document at the time of creation.

-
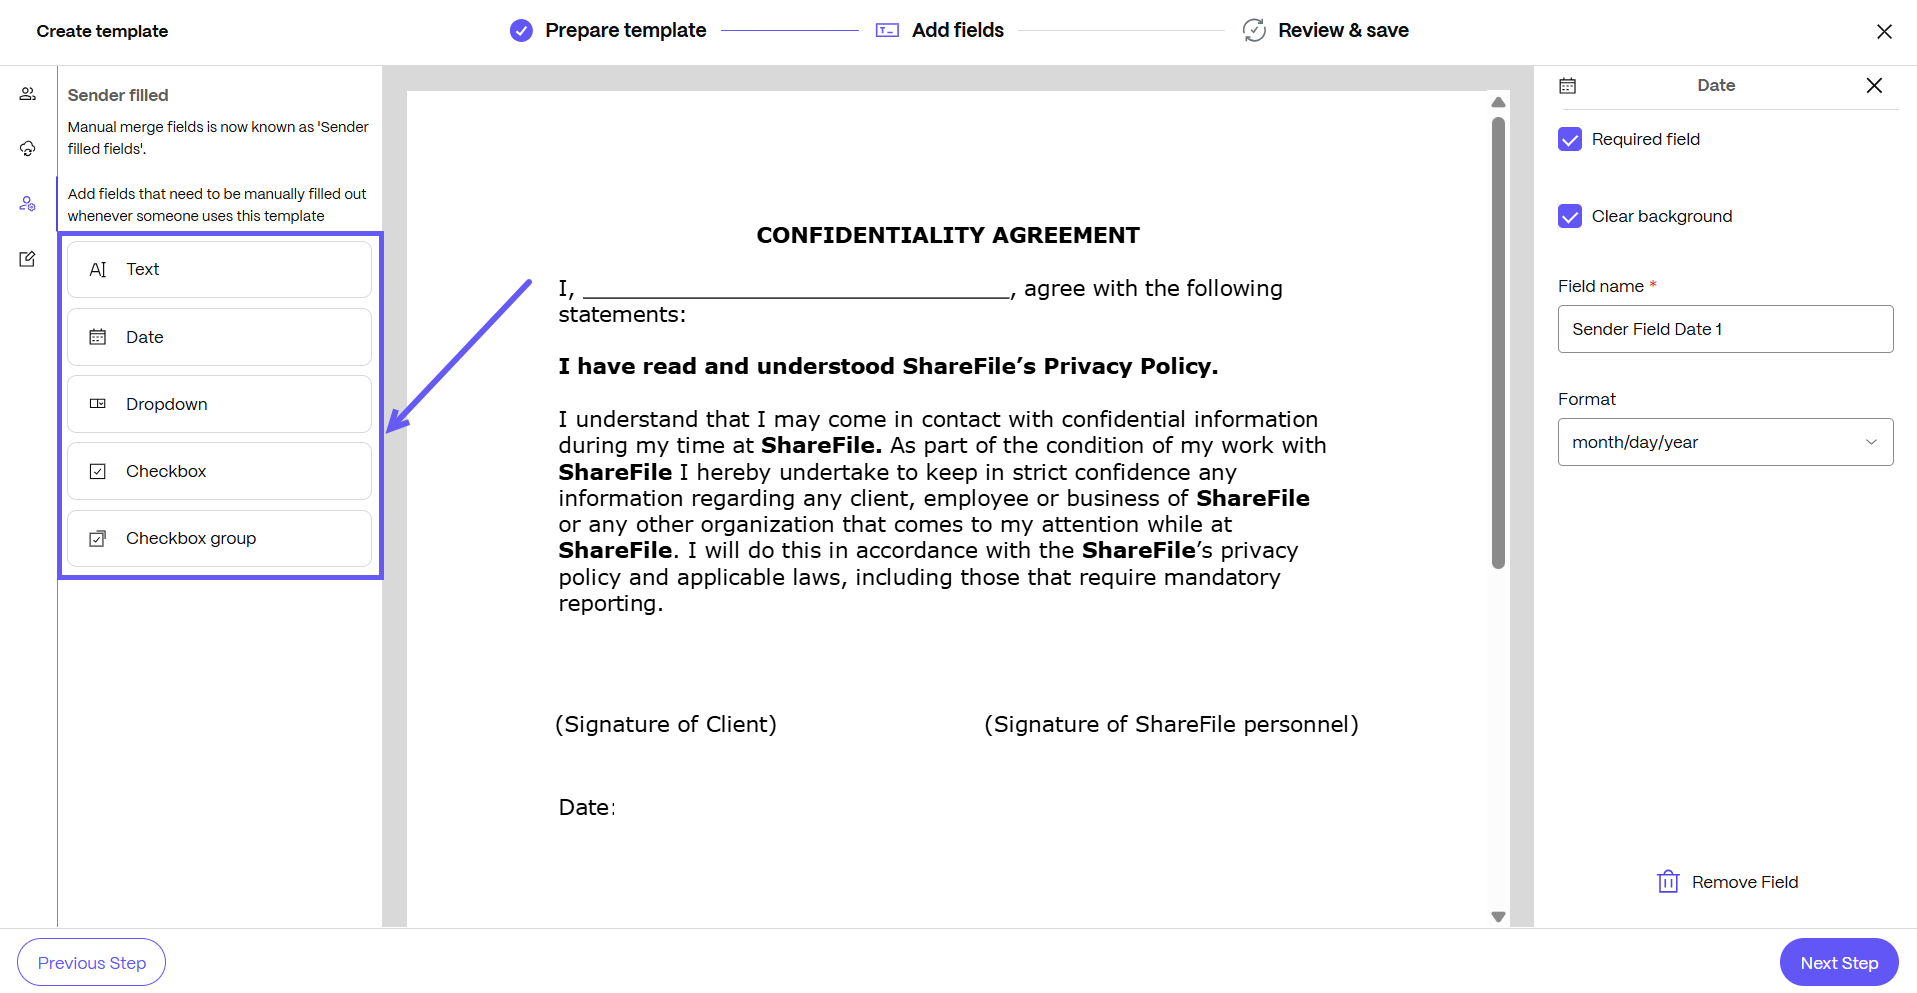
Sender-filled fields: Using these fields, senders manually enter variable data in a document template at the time of creation before sending it for signature. These fields are useful when the required data cannot be automatically populated using variables from integrated systems such as CRM. We currently support the following types of sender fields:
- Text
- Date
- Dropdown
- Checkbox
- Checkbox group
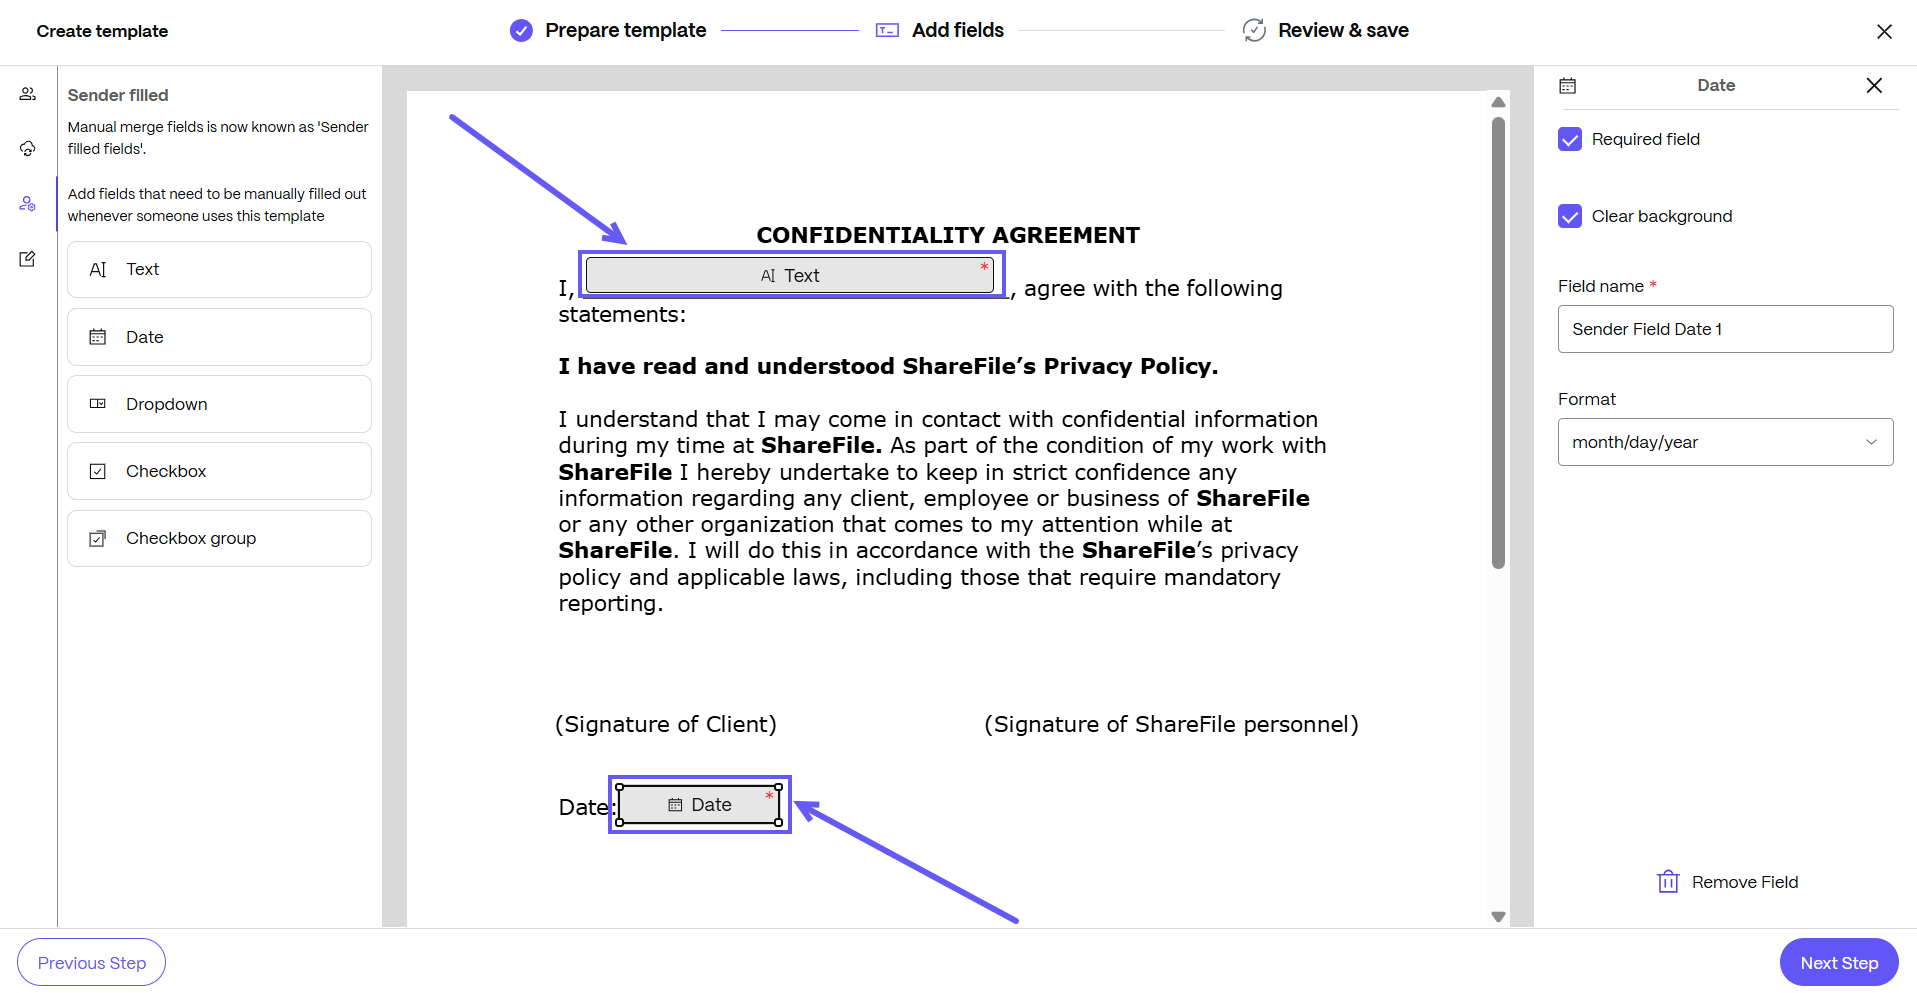
For example, in this Confidentiality agreement template, the sender manually adds name and date fields that are locked after recipients are added.
Share a document template
You can share a document template in two ways as classified below:
Share a document template with an individual recipient
-
In ShareFile, navigate to Templates.
-
From the Templates page, select the document template that you’d like to share.
-
Select Share. The Share resource screen displays.

-
Type in the name of the recipient in the To field.
-
Under Permissions select the role that you want to assign to the recipient. To view the permissions associated with each role select View.
Role Permissions Purpose Viewer Recipient can view template and the underlying file Ideal for recipients that will be using this template for their document workflows. They will not be able to edit or modify the template. Contributor The recipient can view and modify the template and can view, modify and delete the underlying file. Ideal for recipients that will be making changes to the template or the underlying file. The changes that are made by the recipient will be reflected for all users who are using the template.
| Creator | The recipient will have the same permissions as the template creator | Ideal for delegating the ownership of the template to another employee. For example, if an employee is leaving the organization, a template can be shared with another employee for long-term maintenance. | | Custom | Recipient will have custom permissions based on your selection | Ideal for cases where default roles don’t serve the need. Granular permissions can be set for the recipient. |
-
Select Share.
The recipient can view this template in their template library under the Shared with me tab.
Share a document template with other people in your organization
ShareFile now provides an improved share experience for your templates where you can bulk share templates without having to manually set permissions and share with each user. To do so, follow the steps given below:
Share Template With Bulk Users
-
Log in to your ShareFile account. From the dashboard, go to the Templates menu.

-
Create a new template and follow the steps as given in https://docs.sharefile.com/en-us/sharefile/catalog/templates/document-templates .
-
Once the new template has been created and the template preview window opens, click on the Manage access button as shown below:

-
The Manage access window is displayed. Click on the Share button.

-
The Share window opens. Click on the toggle as shown below and set the permissions for everyone who can use the created template. By default, your permissions are set to Creator.

-
When selecting the permissions role from the drop-down menu, you can also view the set of permissions associated with each role by clicking on the View button next to the role as shown below:


Note:
The set of permissions remains the same as step 5 in the previous section.
-
Once done, click on the Share button and the template is shared with everyone who has access to this template with the assigned permissions.

Note:
All employees added as part of ShareFile get access. Shared templates will appear in their Shared with me tab.
-
You can change permissions to the template later by going to the Templates library and selecting the template and clicking on Manage access to open the user access list and changing the permissions assigned to each user.

Share Existing Templates
You can also share existing templates created by you from the Template library as well.
-
To do so simply open any template created by you from the Template library and click on the Manage access option.

-
The Manage access window opens. Follow steps 4-8 given in the above section and the template will be shared with everyone with the desired permissions.
Duplicate Templates in ShareFile
You can now duplicate templates from your ShareFile Templates library. To do so, follow the steps given below:
-
Login to your ShareFile account. From the dashboard, go to the Templates menu.

-
Open the desired template which you want to duplicate. From the preview screen, select the Duplicate option on the right as shown below:

-
The Duplicate template editor screen is displayed. You can add the Name and description for the duplicate template copy. Once done, click on the Duplicate button.

-
The duplicate template is successfully created, and a success message is displayed on the top right corner. You can click on the View template button to view the template directly or you can also go back to the Templates library and find the duplicate template for later use.