This content has been machine translated dynamically.
Dieser Inhalt ist eine maschinelle Übersetzung, die dynamisch erstellt wurde. (Haftungsausschluss)
Cet article a été traduit automatiquement de manière dynamique. (Clause de non responsabilité)
Este artículo lo ha traducido una máquina de forma dinámica. (Aviso legal)
此内容已经过机器动态翻译。 放弃
このコンテンツは動的に機械翻訳されています。免責事項
이 콘텐츠는 동적으로 기계 번역되었습니다. 책임 부인
Este texto foi traduzido automaticamente. (Aviso legal)
Questo contenuto è stato tradotto dinamicamente con traduzione automatica.(Esclusione di responsabilità))
This article has been machine translated.
Dieser Artikel wurde maschinell übersetzt. (Haftungsausschluss)
Ce article a été traduit automatiquement. (Clause de non responsabilité)
Este artículo ha sido traducido automáticamente. (Aviso legal)
この記事は機械翻訳されています.免責事項
이 기사는 기계 번역되었습니다.책임 부인
Este artigo foi traduzido automaticamente.(Aviso legal)
这篇文章已经过机器翻译.放弃
Questo articolo è stato tradotto automaticamente.(Esclusione di responsabilità))
Translation failed!
How to convert a standard app to “Contact” app type
If you are using a standard app to manage your contacts, you might like to convert it to the “Contact” app type (released December 2015). When your app is of this type, it will have a number of default and unremovable fields like “name” and “email address”, which will allow you to take advantage of third-party extensions and contact sync tools.
Tip: This process includes the duplication of data and removal of the original data. It is probably a good idea to make a clone of the app (with data!) that you are converting, just in case something goes wrong in the process.
This conversion can be done with the following steps for apps with no more than 20,000 items:
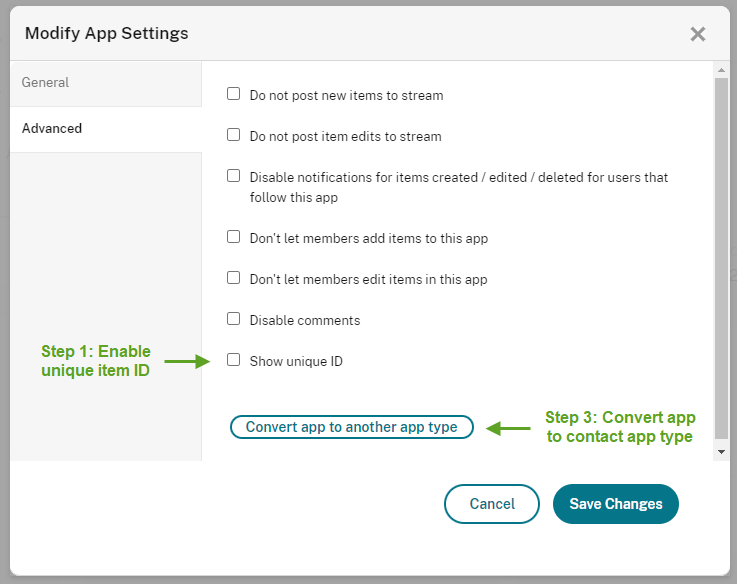
- Enable Unique ID in the Advanced tab of the app settings (if not already enabled) (see image below)
- Export all items in the app, including the Unique ID and any fields with emails, phone numbers and all other fields that should go mapped to a specific contact type field.
- Convert the app to a contact type app (see image below), adding all the fields that cannot be directly mapped. For example, “Name” can probably be mapped to an existing text field you already have with the contact’s name. On the other hand, if you were using a text field for the contact’s email address, it cannot be mapped because the contact app type expects this field to be an email field. In such cases, choose “Create new field” to create a new email field as part of the conversion.
- Now the app has a number of newly added fields (for example “Email”), temporarily rename the duplicate fields that could not be directly mapped. For instance, you can name the original field “Old_email” and keep the new set to “Email”.
- Do an Excel import of the exported data back into the app.
- Map the Unique ID from the exported data to the Unique ID in the app.
- Map the old fields that need to be converted into a new field type to the corresponding newly added field (ie. map the “Old_email” text field to the new “Email” email field.)
- Let the import finish.
- Delete the old fields that are now duplicates, like the “Old_email” field. When you delete the old one, you can also delete the data (as it has been copied over). Be cautious in this step: make sure to delete the right field and that the import was successful, so that the data has indeed be duplicated into the new field!
- Optional: Disable Unique ID again
- All done. You know have a contact type app with the correct data in the correct fields.
Share
Share
In this article
This Preview product documentation is Citrix Confidential.
You agree to hold this documentation confidential pursuant to the terms of your Citrix Beta/Tech Preview Agreement.
The development, release and timing of any features or functionality described in the Preview documentation remains at our sole discretion and are subject to change without notice or consultation.
The documentation is for informational purposes only and is not a commitment, promise or legal obligation to deliver any material, code or functionality and should not be relied upon in making Citrix product purchase decisions.
If you do not agree, select I DO NOT AGREE to exit.