This content has been machine translated dynamically.
Dieser Inhalt ist eine maschinelle Übersetzung, die dynamisch erstellt wurde. (Haftungsausschluss)
Cet article a été traduit automatiquement de manière dynamique. (Clause de non responsabilité)
Este artículo lo ha traducido una máquina de forma dinámica. (Aviso legal)
此内容已经过机器动态翻译。 放弃
このコンテンツは動的に機械翻訳されています。免責事項
이 콘텐츠는 동적으로 기계 번역되었습니다. 책임 부인
Este texto foi traduzido automaticamente. (Aviso legal)
Questo contenuto è stato tradotto dinamicamente con traduzione automatica.(Esclusione di responsabilità))
This article has been machine translated.
Dieser Artikel wurde maschinell übersetzt. (Haftungsausschluss)
Ce article a été traduit automatiquement. (Clause de non responsabilité)
Este artículo ha sido traducido automáticamente. (Aviso legal)
この記事は機械翻訳されています.免責事項
이 기사는 기계 번역되었습니다.책임 부인
Este artigo foi traduzido automaticamente.(Aviso legal)
这篇文章已经过机器翻译.放弃
Questo articolo è stato tradotto automaticamente.(Esclusione di responsabilità))
Translation failed!
RightSignature - Stripe Integration
The objective of this article is to Process payments or collect credit card information on your documents.
Setting up the Integration
Start by selecting Account in the upper left hand corner, then click Integrations and scroll down to Stripe.
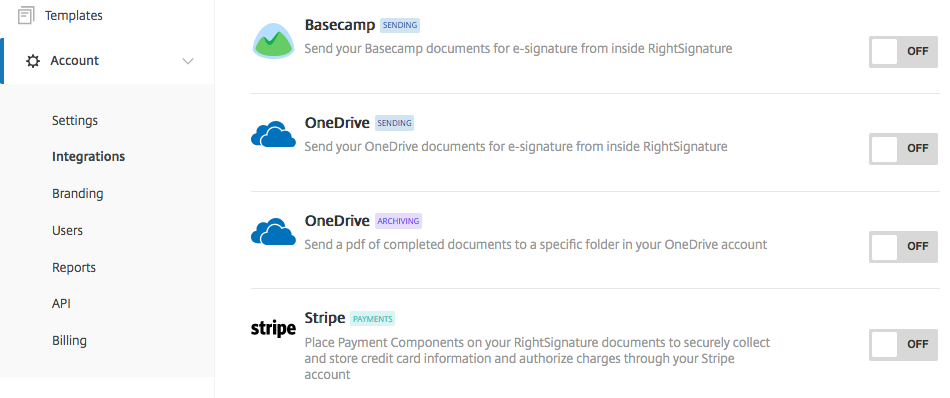
Next, click Off next to Stripe and you will be redirected to Stripe’s website to either create a new account or Sign In.

Once completed, you will be returned to RightSignature and receive a notification stating ‘Successfully authorized Stripe,’ and the integration will now show it is turned on.

Using the Integration
You can add a Collect Payment request field to a Template or one-off document. On the Place Fields step, click Show More under Request and select the Collect Payment field to place it on the document.
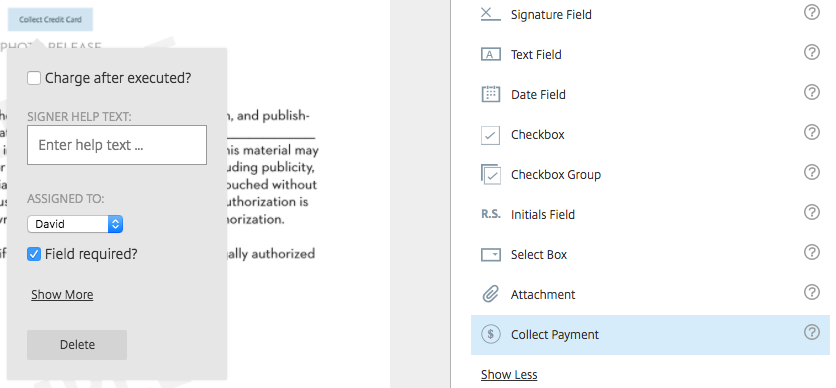
Once placed, click on Collect Credit Card to assign it to a particular signer, enter Signer Help Text, or check Charge After Executed.
There are two payment options:
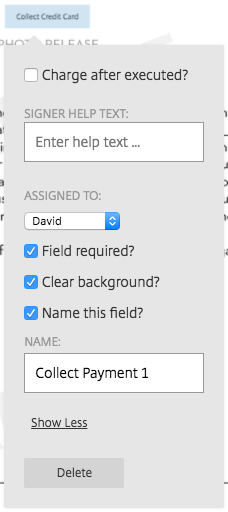
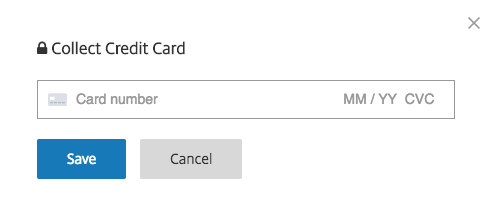
Collect Credit Card
Used when the document sender needs to store credit card information in Stripe but does not want to set up an automatic payment at this time. Make sure to leave Charge After Executed unchecked.
Charge After Executed
Used when the document sender wants Stripe to set up an automatic payment once the document is fully executed. Credit card information will be stored in Stripe. The Collect Credit Card box switches to Authorize Payment and a Payment Amount must be entered (in US Dollars only).
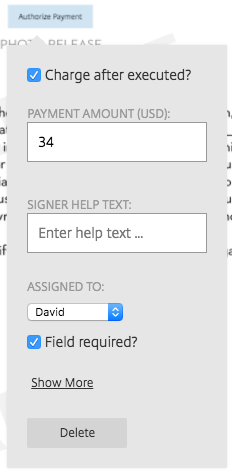
Authorize Payment means the recipient has given an okay to the charge. It does not mean the card will be charged at that moment. Credit cards may be declined after the document is signed.
Signer’s Perspective
The signer will click on the link in the email as with any other document, or go to the website if the template is embedded online. The payment field will show up as “Credit Card.”

The signer clicks on “Credit Card” to be taken to either of the following boxes, depending on if Charge After Executed was checked:
or

Clicking Save will allow the signer to proceed to the next field in the document. Credit cards may be declined after the document is signed.

Accessing Payment information
Once signed, the document sender will need to access their Stripe account in order to set up a payment or check the status of a pending payment.

Clicking on the completed field from within RightSignature will show the specific payment ID associated with the signer. Login to Stripe to locate the customer’s profile.

Note:
This feature is not available on Personal, Basic, and Accounting RightSignature plans. See Plans & Billing for more information.
The Collect Payments feature enables signers to provide credit card payment information securely while they fill out and sign RightSignature documents. Signer’s credit card information is stored and processed securely by the online payment processing service Stripe, which is certified as PCI Service Provider Level 1.
Access Stripe’s Pricing Page for more information on what they charge.
Share
Share
This Preview product documentation is Citrix Confidential.
You agree to hold this documentation confidential pursuant to the terms of your Citrix Beta/Tech Preview Agreement.
The development, release and timing of any features or functionality described in the Preview documentation remains at our sole discretion and are subject to change without notice or consultation.
The documentation is for informational purposes only and is not a commitment, promise or legal obligation to deliver any material, code or functionality and should not be relied upon in making Citrix product purchase decisions.
If you do not agree, select I DO NOT AGREE to exit.