This content has been machine translated dynamically.
Dieser Inhalt ist eine maschinelle Übersetzung, die dynamisch erstellt wurde. (Haftungsausschluss)
Cet article a été traduit automatiquement de manière dynamique. (Clause de non responsabilité)
Este artículo lo ha traducido una máquina de forma dinámica. (Aviso legal)
此内容已经过机器动态翻译。 放弃
このコンテンツは動的に機械翻訳されています。免責事項
이 콘텐츠는 동적으로 기계 번역되었습니다. 책임 부인
Este texto foi traduzido automaticamente. (Aviso legal)
Questo contenuto è stato tradotto dinamicamente con traduzione automatica.(Esclusione di responsabilità))
This article has been machine translated.
Dieser Artikel wurde maschinell übersetzt. (Haftungsausschluss)
Ce article a été traduit automatiquement. (Clause de non responsabilité)
Este artículo ha sido traducido automáticamente. (Aviso legal)
この記事は機械翻訳されています.免責事項
이 기사는 기계 번역되었습니다.책임 부인
Este artigo foi traduzido automaticamente.(Aviso legal)
这篇文章已经过机器翻译.放弃
Questo articolo è stato tradotto automaticamente.(Esclusione di responsabilità))
Translation failed!
Document Requests
A Document Request in ShareFile Projects allows users to securely request, collect, and manage files from internal team members or external clients — all within the project workspace. You can use this feature when you need a structured and auditable way to gather documents tied to a specific workflow or engagement.
Key use cases
You can use document requests:
- To request files from clients, vendors, or partners as part of onboarding, auditing, or project collaboration.
- To streamline back-and-forth document collection without relying on email attachments.
- When you want real-time tracking of upload progress and submission deadlines.
- When file submissions need to be securely stored and associated with a project for audit or compliance.
Key benefits
- Provides a centralized, secure channel for file collection.
- Automatically tracks progress, completion, and overdue uploads.
- Reduces back-and-forth communication through integrated notifications.
- Maintains audit trails for compliance and recordkeeping.
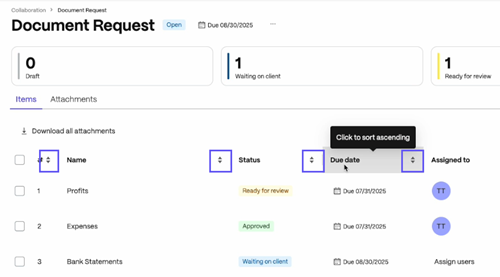
Life cycle of a Document Request
| Stage | Description | User Actions |
|---|---|---|
| Draft | Created but not shared. | Add or edit items and recipients. |
| Waiting on client | Shared and open for submissions. | Upload, approve, or reject items. |
| Ready for review | All required items uploaded. | A reviewer can approve, reject or add comment. |
| Approved | All items submissions completed. | Files remain viewable. |
Document Request Limitations
- This feature is available for ShareFile Premium and higher plans only.
- Clients cannot delete or edit existing document requests.
- Any file uploads within comments are not supported.
- AI-powered request creation supports English prompts only.
- Bulk editing across multiple requests is currently unavailable.
Additional Document Requests options
See Improved Document Request List (DRL) Experience FAQ to find answers to the most common questions about this enhancement.
Numbering
Each item has a number that makes it easier to reference items in conversations.

Sorting
Users can sort the items list by number, due date, status, or assignee.
Expanded Workspace
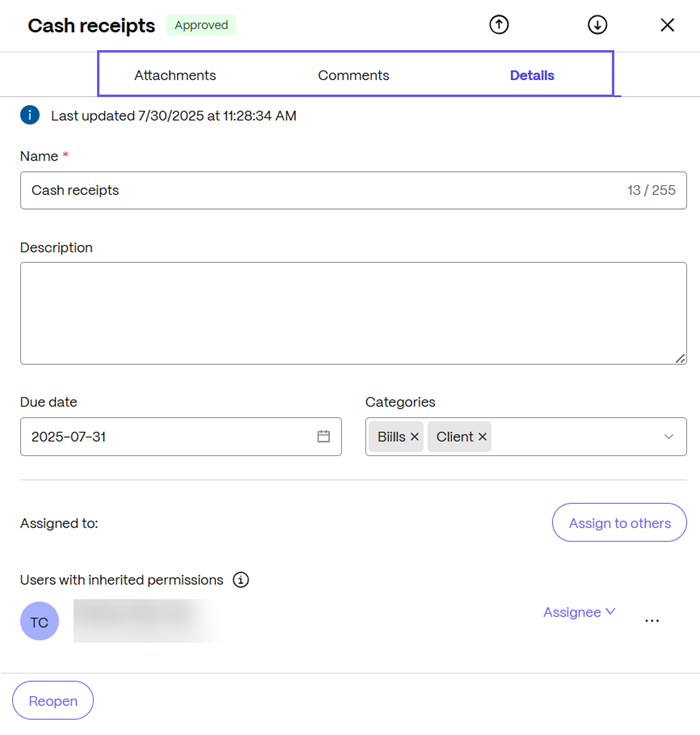
More space for document review and to manage items; clicking on any item opens an expanded workspace with three tabs: Details, Comments, and Attachments—all in one place—while keeping the Document Request list view for context. Users can navigate between items using this side panel.
Share
Share
This Preview product documentation is Citrix Confidential.
You agree to hold this documentation confidential pursuant to the terms of your Citrix Beta/Tech Preview Agreement.
The development, release and timing of any features or functionality described in the Preview documentation remains at our sole discretion and are subject to change without notice or consultation.
The documentation is for informational purposes only and is not a commitment, promise or legal obligation to deliver any material, code or functionality and should not be relied upon in making Citrix product purchase decisions.
If you do not agree, select I DO NOT AGREE to exit.