This content has been machine translated dynamically.
Dieser Inhalt ist eine maschinelle Übersetzung, die dynamisch erstellt wurde. (Haftungsausschluss)
Cet article a été traduit automatiquement de manière dynamique. (Clause de non responsabilité)
Este artículo lo ha traducido una máquina de forma dinámica. (Aviso legal)
此内容已经过机器动态翻译。 放弃
このコンテンツは動的に機械翻訳されています。免責事項
이 콘텐츠는 동적으로 기계 번역되었습니다. 책임 부인
Este texto foi traduzido automaticamente. (Aviso legal)
Questo contenuto è stato tradotto dinamicamente con traduzione automatica.(Esclusione di responsabilità))
This article has been machine translated.
Dieser Artikel wurde maschinell übersetzt. (Haftungsausschluss)
Ce article a été traduit automatiquement. (Clause de non responsabilité)
Este artículo ha sido traducido automáticamente. (Aviso legal)
この記事は機械翻訳されています.免責事項
이 기사는 기계 번역되었습니다.책임 부인
Este artigo foi traduzido automaticamente.(Aviso legal)
这篇文章已经过机器翻译.放弃
Questo articolo è stato tradotto automaticamente.(Esclusione di responsabilità))
Translation failed!
ShareFile single sign-on configuration guide for ADFS 4
Prerequisites
- Domain joined Windows Server 2016 host
- Publicly accessible FQDN associated with public IP (Example:
<adfs>.yourdomain.com) - Valid SSL certificate associated with site FQDN (Wildcards are supported)
- Port 443 open inbound and outbound on public IP associated with AD FS FQDN
Note:
Account URL is your ShareFile account URL in the form of
https://mysubdomain.sharefile.comor, in Europe,https://mysubdomain.sharefile.eu.
Add ADFS Role
- Launch Server Manager.
- Click Manage at the top right.
-
Click Add Roles and Features.
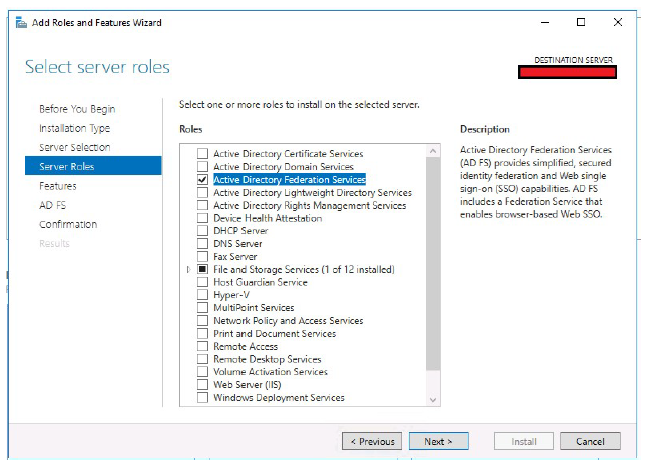
- Select Active Directory Federation Services.
-
Click Next.
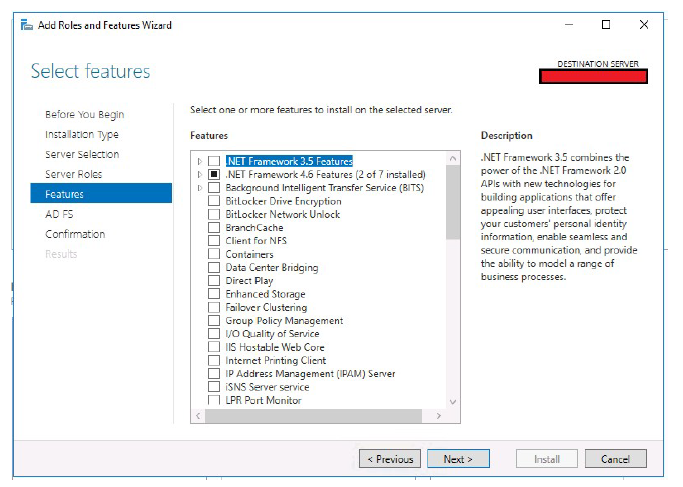
-
Click Next.
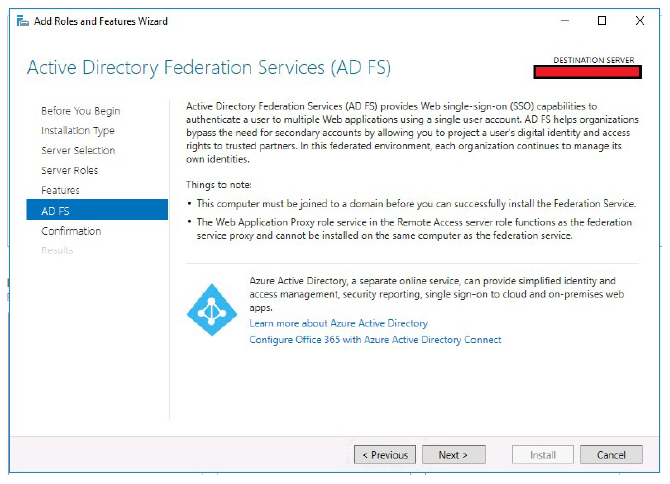
-
Click Next.
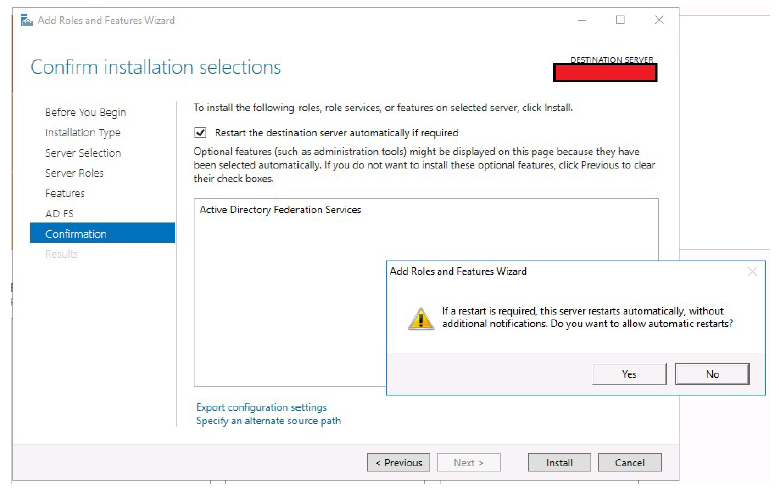
- Select Restart the destination server automatically if required.
-
Click Install, respond Yes to the restart prompt.
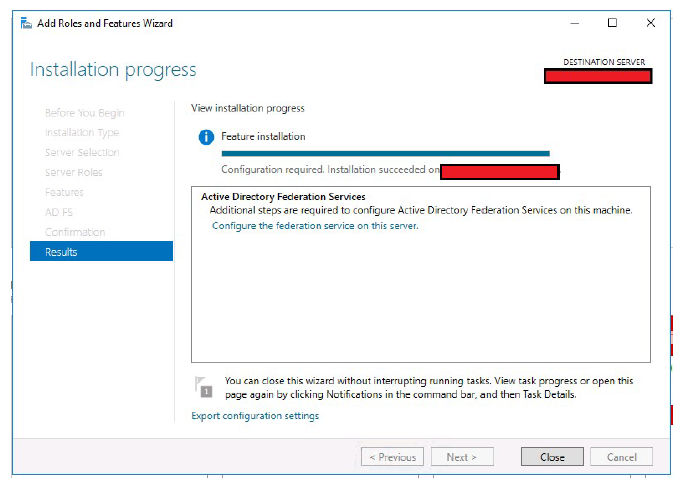
- You now see this screen upon successful install of the role. Click Close.
Configure ADFS
- Open Server Manager.
-
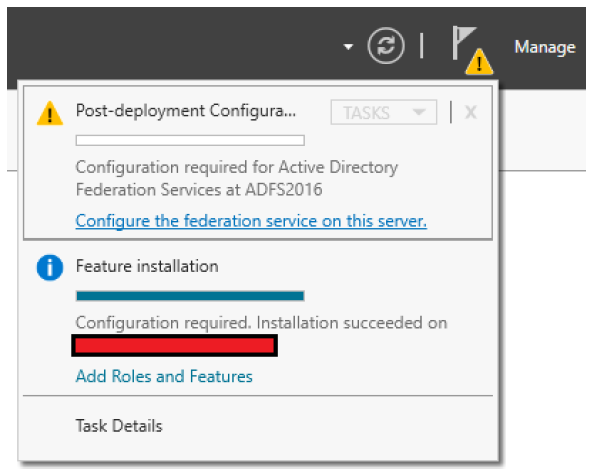
Click the flag icon with the yellow caution symbol.
-
Click Configure the federation service on this server.
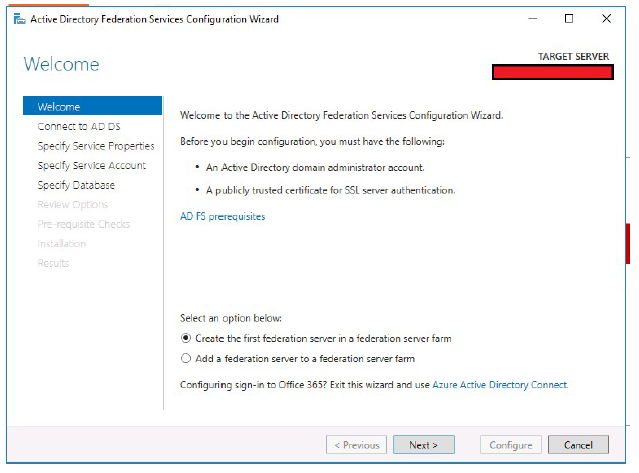
- Select the Create the first federation server in a federation server farm radio button.
-
Click Next.
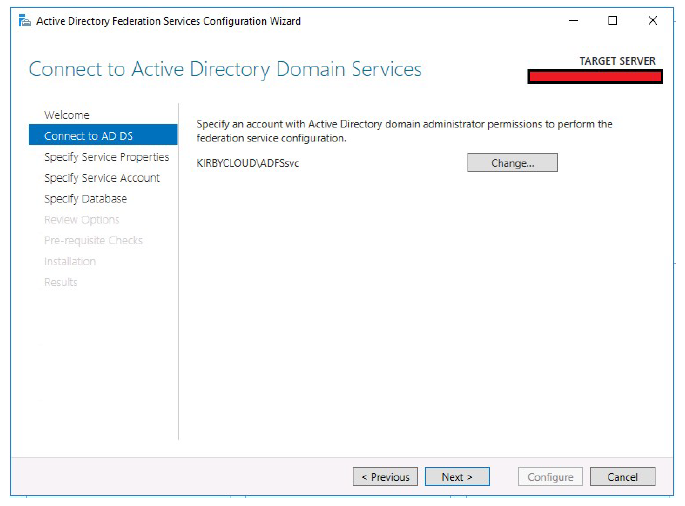
- Define a domain admin account to configure ADFS.
-
Click Next.
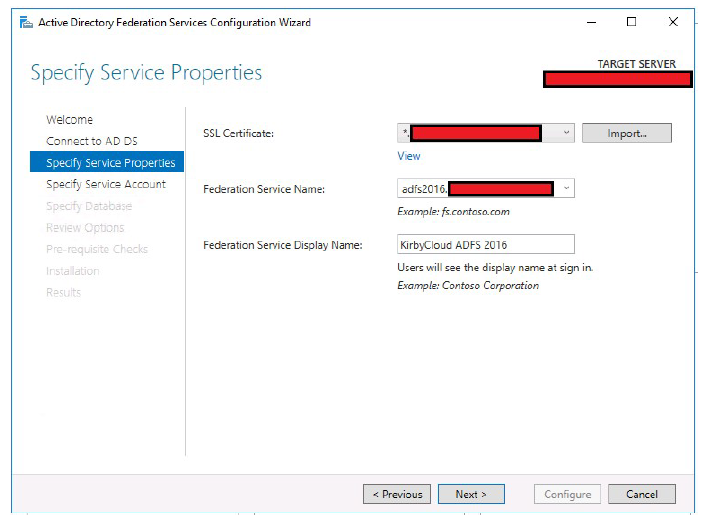
- Select the public SSL certificate. This certificate must be imported on the host before ADFS configuration.
- Type in a Federation Service Name. This name must match the FQDN you created for ADFS.
Example:
adfs2016.yourdomain.com - Type in a Service Display Name. This name is the text that shows on a forms based login page.
-
Click Next.
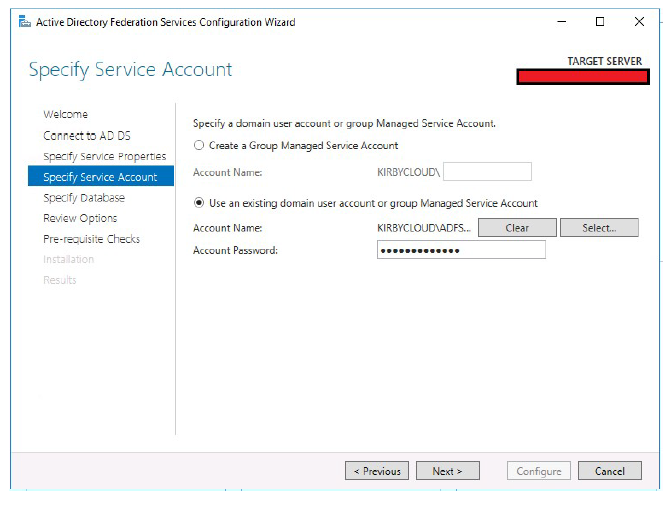
- Specify the service account ADFS uses.
-
Click Next.
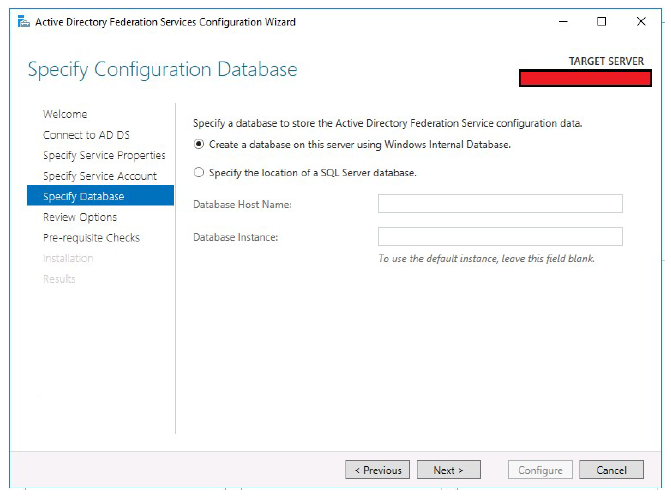
- Select the database type.
-
Click Next.
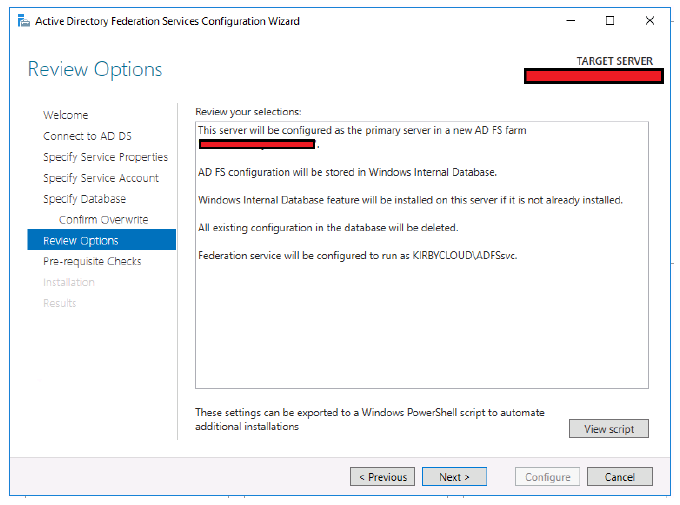
- Review the changes before they are made.
-
Click Next.
-
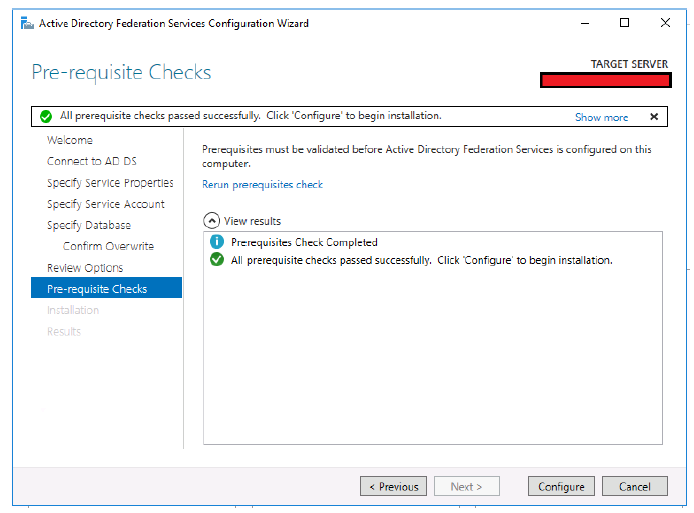
Click Configure if all prerequisite checks completed successfully.
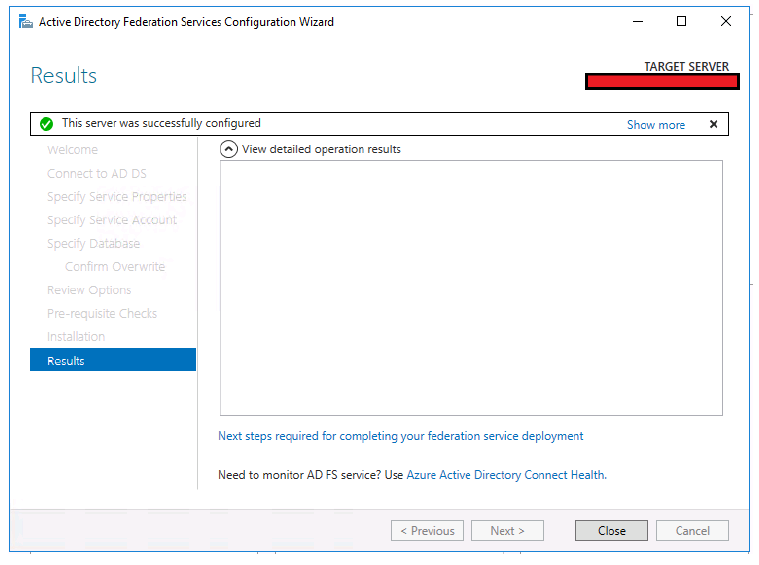
- Upon successful configuration of ADFS, you now see this screen.
- Click Close.
Enable IdP-initiated sign-in
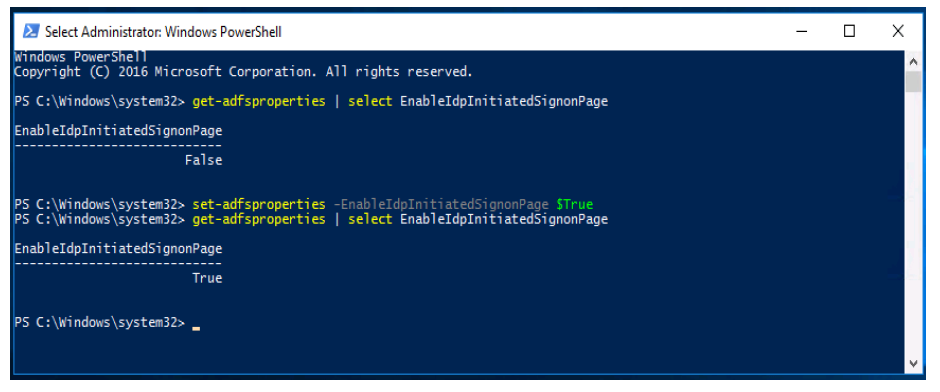
The IdP-initiated sign-in page confirms that ADFS accepts your domain credentials before establishing service provider trusts. By default, this page is disabled on Windows Server 2016 environments. Use PowerShell to enable IdP-initiated sign-in.
- Launch PowerShell as administrator.
- Run the command
set-adfsproperties –EnableIDPInitiatedSignonPage $True. -
You can now browse to
https://<adfs.domain.com>/adfs/ls/idpinitiatedsignon.aspxand sign in.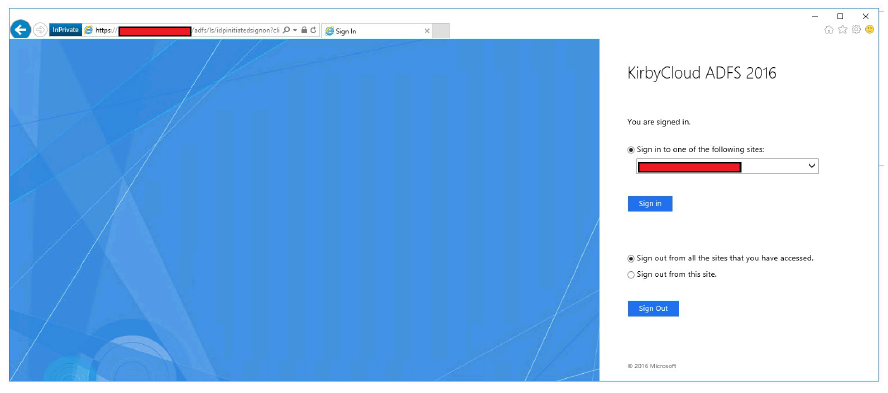
Export token-signing certificate
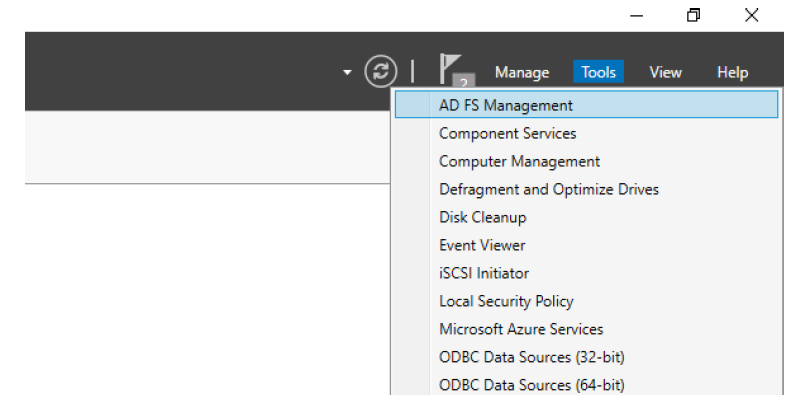
-
Launch the ADFS management console from Server Manager.
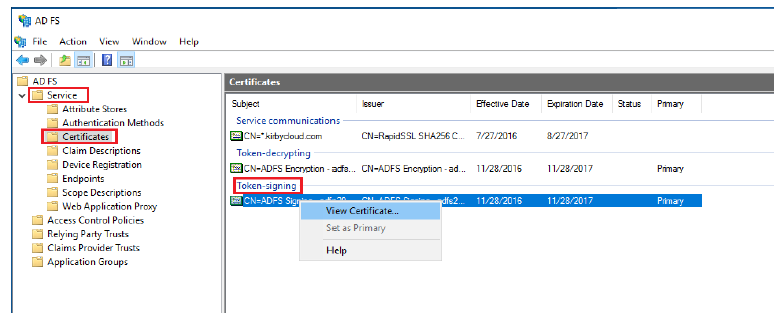
- Expand Service.
- Select Certificates.
-
Right-click the Primary token-signing certificate. Select View Certificate…
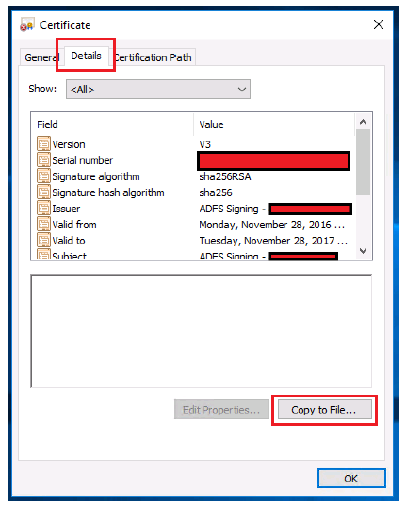
- Select the Details tab.
-
Click Copy to File….
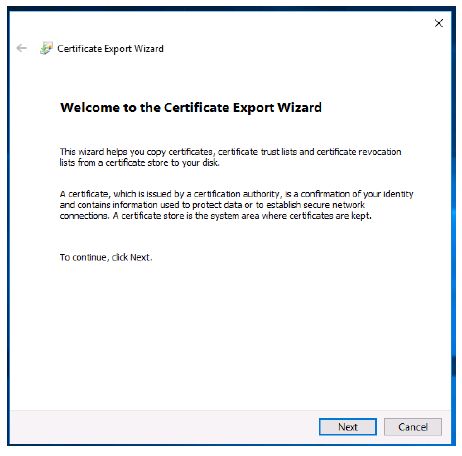
-
Click Next.
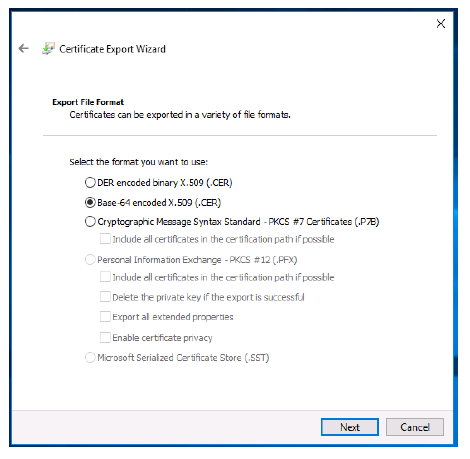
- Select the Base-64 encoded X.509 (.CER) radio button.
- Click Next.
-
Click Browse.
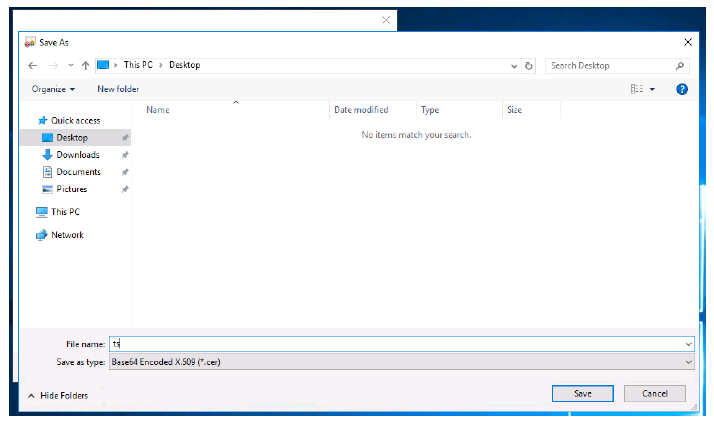
- Choose a location to export your token-signing certificate.
- Name your token-signing certificate.
-
Click Save.
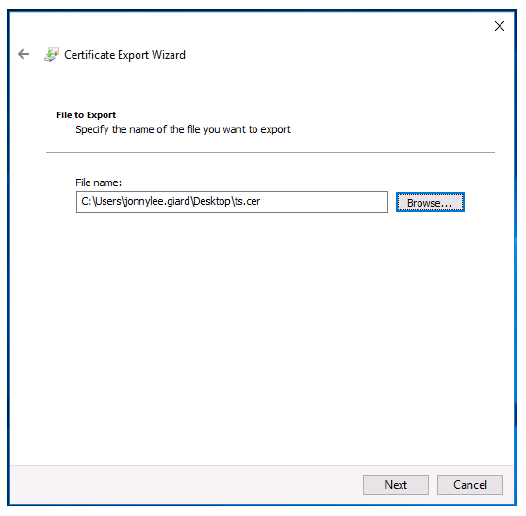
-
Click Next.
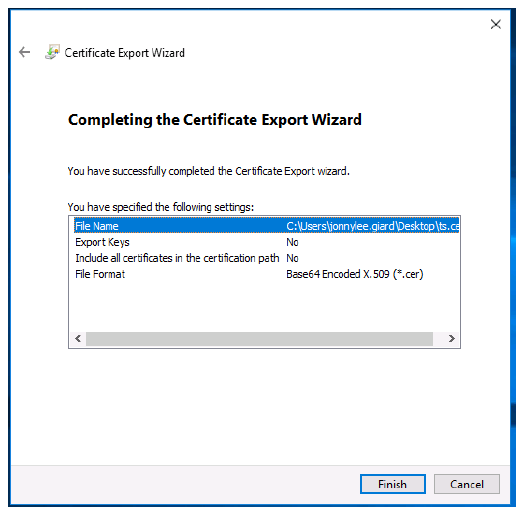
-
Click Finish.
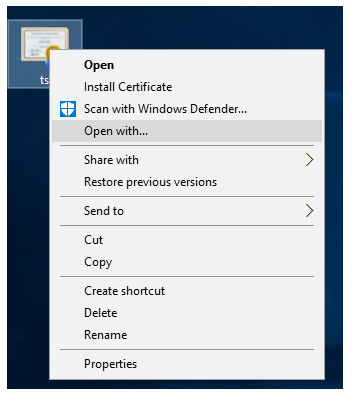
- Right-click on the exported token-signing certificate.
- Click Open with….
-
Choose Notepad.
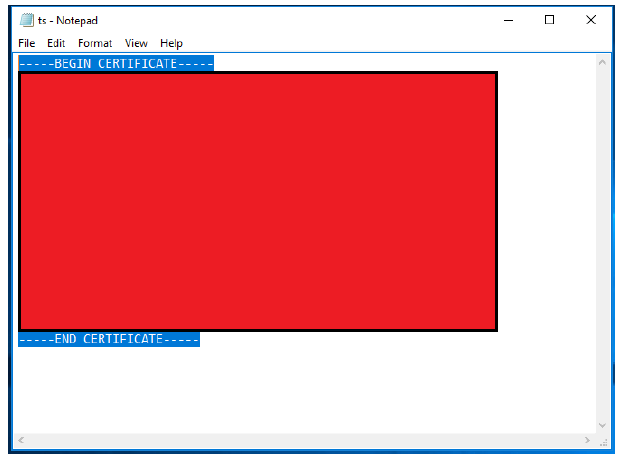
- Copy the contents of your token-signing certificate
Configure ShareFile account
- Sign in to your ShareFile account using your web browser.
- Click Account settings.
- Expand Security.
- Click Login & Security Policy. Scroll to the bottom of page and go to Single sign-on / SAML 2.0 Configuration
- Add your
https://<subdomain>.sharefile.com/saml/infounder the ShareFile Issuer / Entity ID - Add your
https://<adfs>.yourdomain.comunder Your IdP Issuer / Entity ID - Paste contents of exported certificate from previous section under X.509 Certificate
- Add
https://<adfs>.yourdomain.com/adfs/lsunder Login URL - Go to Optional Settings
- Under Enable Web Authentication Select Yes
- Under SP-Initiated Auth Context, add User Name and Password – Minimum
- Save your changes.
Build service provider trust
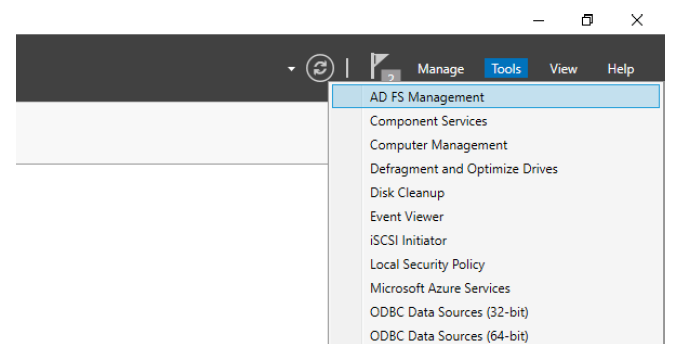
-
Launch ADFS Management from Server Manager.
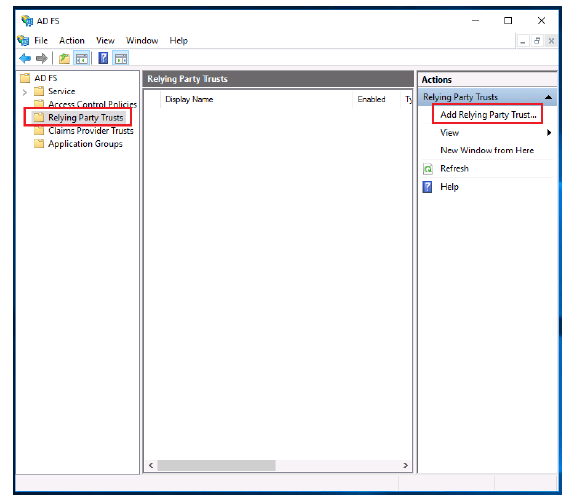
- Select Relying Party Trusts.
-
Click Add Relying Party Trust.
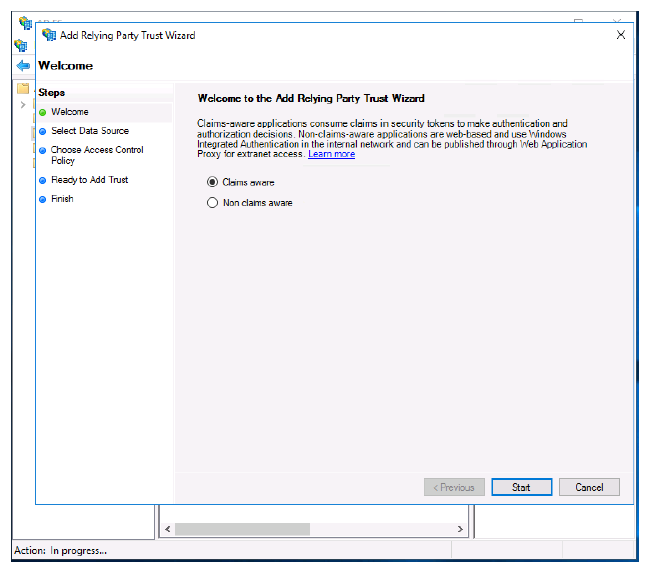
- Select the Claims aware radio button.
-
Click Start.
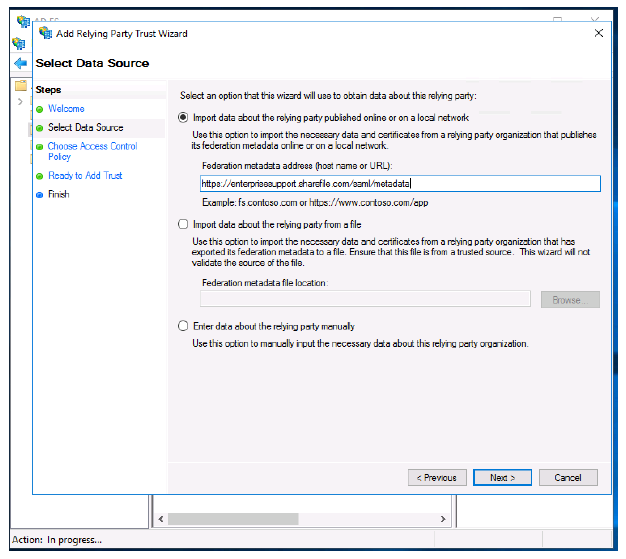
- Type in your ShareFile account’s metadata URL. Example:
https://<subdomain>.sharefile.com/saml/metadata - You can also browse to this URL, copy the contents, and save as an .xml file if you would rather import the SAML metadata using a file. Also, you can type in this information manually by selecting the third radio button.
-
Click Next.
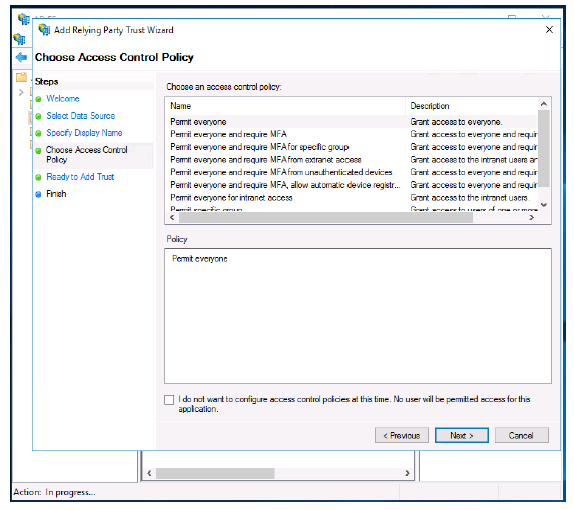
-
Click Next.
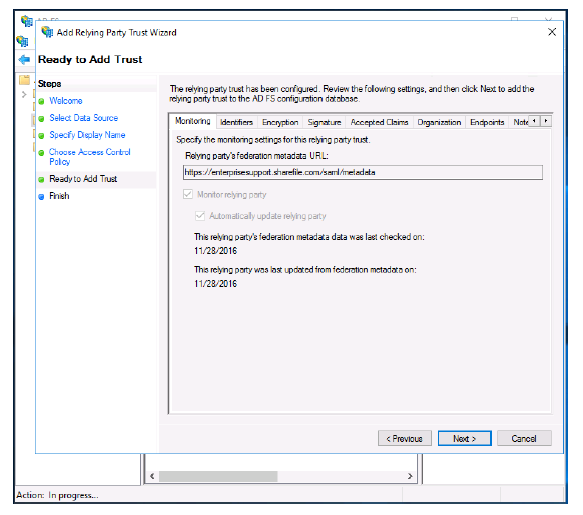
-
Click Next.
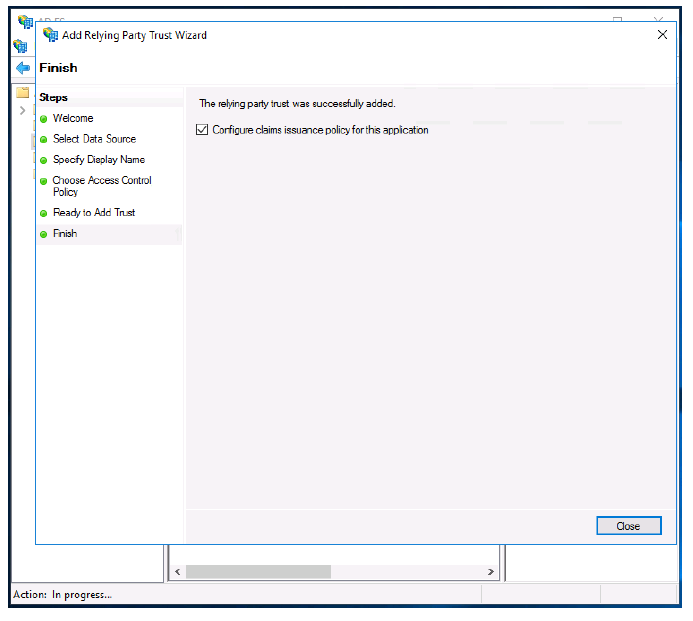
-
Click Close.
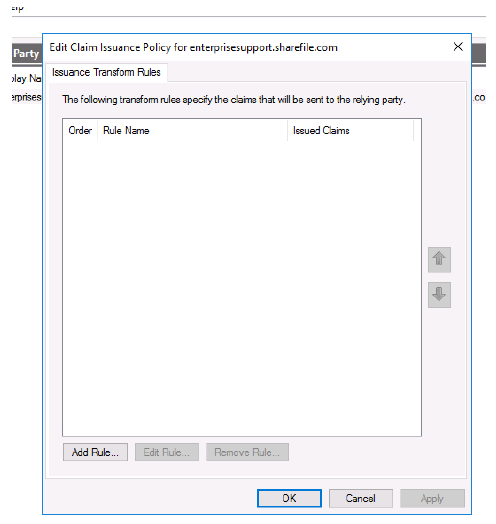
-
Click Add Rule….
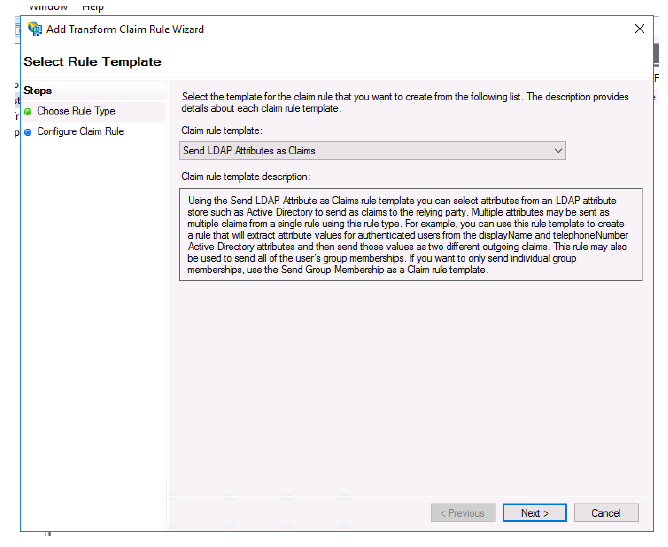
- Select Send LDAP Attributes as Claims from the menu.
-
Click Next.
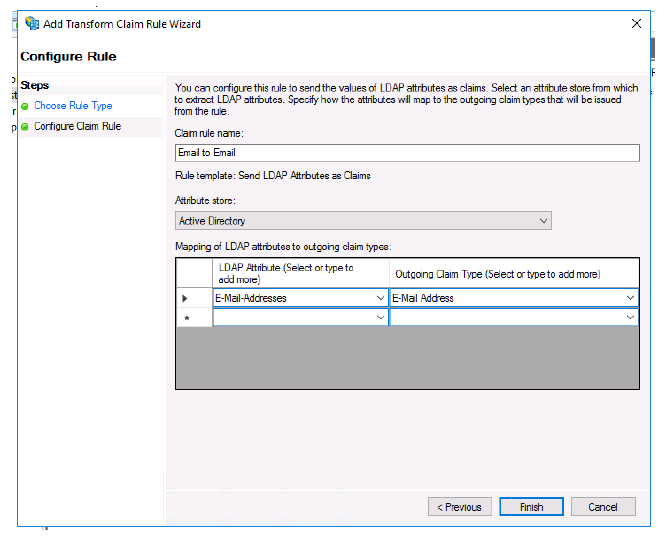
- Name your rule.
- Select Active Directory from the Attribute store menu.
- Select E-Mail Addresses under the first LDAP Attribute menu.
- Select E-Mail Address from the first Outgoing Claim Type menu.
-
Click Finish.
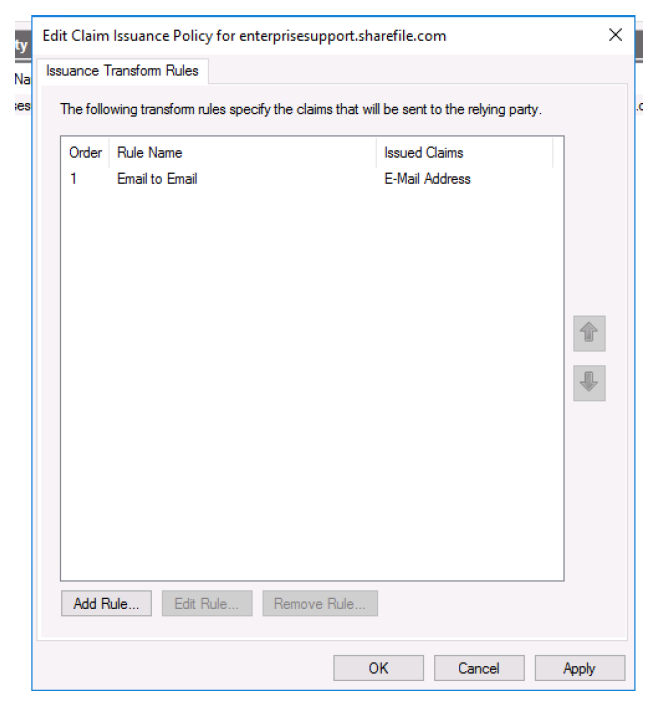
-
Click Add Rule….
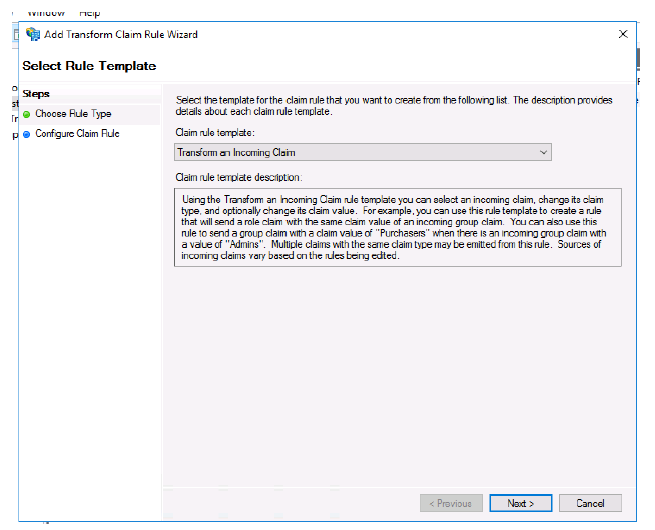
- Select Transform an Incoming Claim.
-
Click Next.
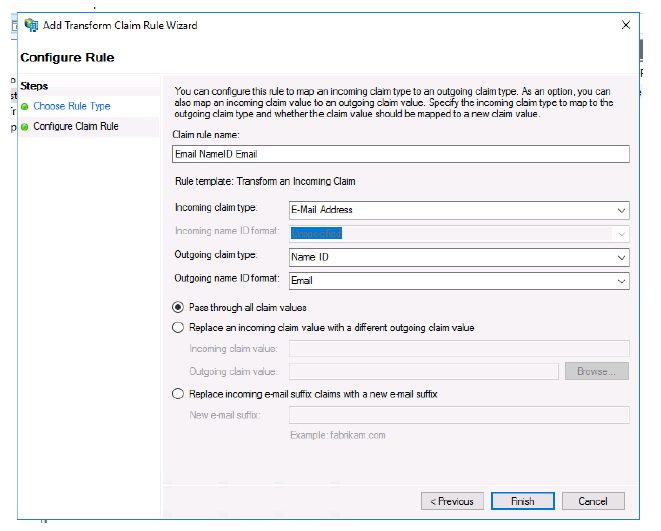
- Name your rule.
- Select E-Mail Address for Incoming claim type:.
- Select Name ID for Outgoing claim type:.
-
Select Email for Outgoing name ID format:.
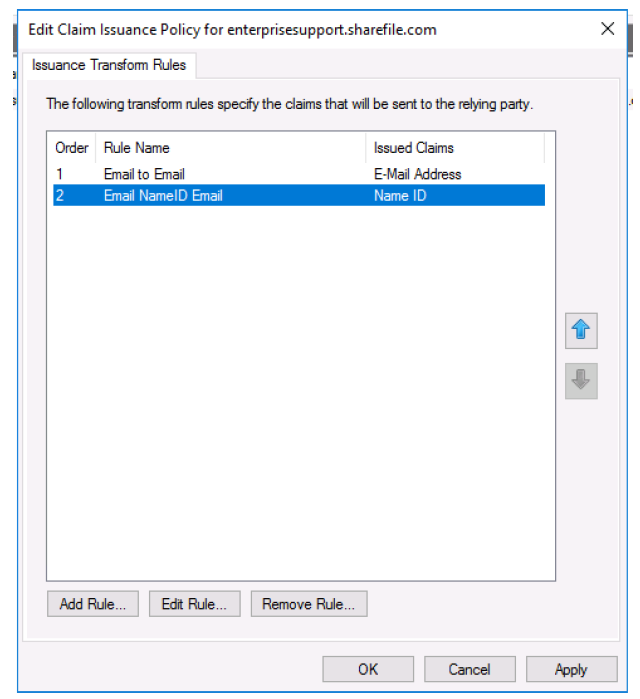
- Click Apply.
- Click OK.
Test your configuration
Browse to your ShareFile account’s SAML login URL. You are now redirected to your ADFS host and asked for credentials. Sign in using credentials associated with the domain your ADFS host is providing federation services for. The email address of your AD user must match the email address of a user in Sharefile. If the credentials are correct and your email address matches a ShareFile user, you are signed into the ShareFile account associated with your email.
Share
Share
This Preview product documentation is Citrix Confidential.
You agree to hold this documentation confidential pursuant to the terms of your Citrix Beta/Tech Preview Agreement.
The development, release and timing of any features or functionality described in the Preview documentation remains at our sole discretion and are subject to change without notice or consultation.
The documentation is for informational purposes only and is not a commitment, promise or legal obligation to deliver any material, code or functionality and should not be relied upon in making Citrix product purchase decisions.
If you do not agree, select I DO NOT AGREE to exit.