This content has been machine translated dynamically.
Dieser Inhalt ist eine maschinelle Übersetzung, die dynamisch erstellt wurde. (Haftungsausschluss)
Cet article a été traduit automatiquement de manière dynamique. (Clause de non responsabilité)
Este artículo lo ha traducido una máquina de forma dinámica. (Aviso legal)
此内容已经过机器动态翻译。 放弃
このコンテンツは動的に機械翻訳されています。免責事項
이 콘텐츠는 동적으로 기계 번역되었습니다. 책임 부인
Este texto foi traduzido automaticamente. (Aviso legal)
Questo contenuto è stato tradotto dinamicamente con traduzione automatica.(Esclusione di responsabilità))
This article has been machine translated.
Dieser Artikel wurde maschinell übersetzt. (Haftungsausschluss)
Ce article a été traduit automatiquement. (Clause de non responsabilité)
Este artículo ha sido traducido automáticamente. (Aviso legal)
この記事は機械翻訳されています.免責事項
이 기사는 기계 번역되었습니다.책임 부인
Este artigo foi traduzido automaticamente.(Aviso legal)
这篇文章已经过机器翻译.放弃
Questo articolo è stato tradotto automaticamente.(Esclusione di responsabilità))
Translation failed!
Client contacts
ShareFile provides several ways to add a client user. Client contacts have limited access to your ShareFile account based on how they are added and how you set permissions for new clients.
We recommend watching this video on the three ways to create a client contact:
Create Client in manage users
ShareFile users can add clients using the following steps from their ShareFile account dashboard.
-
Sign into ShareFile.
-
Select People > Manage Users Home > Create client contact.
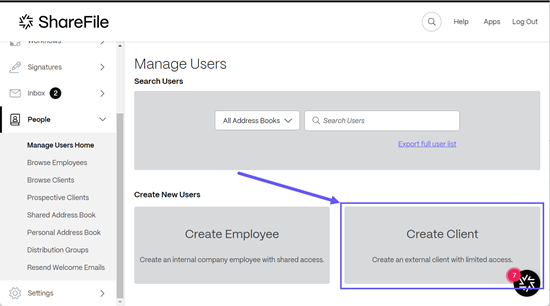
The Create new client contact screen displays.
-
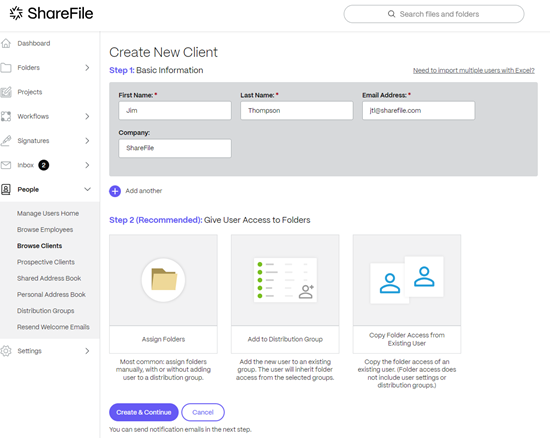
In Step 1: Basic Information enter the information for the client including First Name, Last Name, Email Address, and Company.
-
In Step 2: Give User Access to Folders select Assign Folders. See Give User Access to Folders for more information. Other options include:
-
Copy Folder Access from Existing User - which saves time setting folder access permissions when creating a client. Using the Copy Folder Access option copies only folder permissions, not account permissions.
-
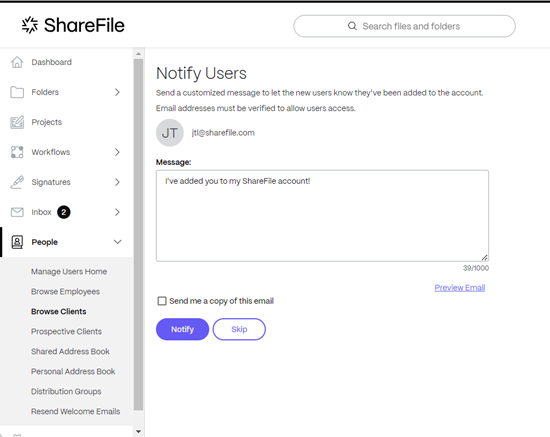
Select Create & Continue. The Notify Users displays and provides the ability to send a customized Welcome message to let the client know they are added to your account.
Important:
New clients must verify their email address to have access.
-
Select Notify.
The “Invitation(s) sent successfully” message displays briefly and the Browse client contacts dashboard screen displays allowing you to review the added client.
Import a list of clients users
You can create multiple client users at once by downloading an Excel template spreadsheet. To import users:
-
Sign into ShareFile.
-
Select People > Manage users home > create client contact.

The Create new client contact screen displays.
-
Select Need to import multiple users with Excel?

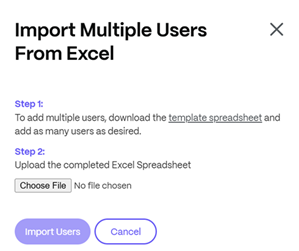
The Import Multiple Users From Excel screen displays:
-
In Step 1 - Download the template spreadsheet and add as many users as desired. Enter the Email Address, First Name, Last Name and Company for each user. Then, Save the file.
-
In Step 2 - Upload the completed Excel Spreadsheet.
-
Once the file is uploaded, select Import Users. The user’s basic information is filled.
-
Select Assign Folders to give the user access to folders.
-
Select Create & Continue and then Notify.
Create a client using a shared file link
ShareFile makes it easy to add a client when you share a file. Use the following steps to complete the process in adding a client when using Share to create a link.
-
Navigate to the file that you want to share in your ShareFile account.
-
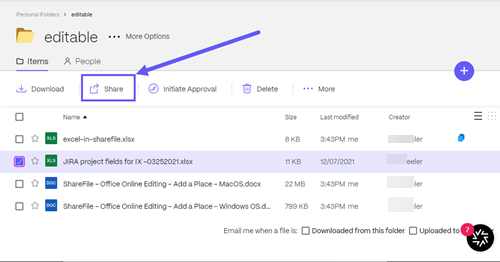
Select the file or files that you want to share.
-
Select Share from the menu.
-
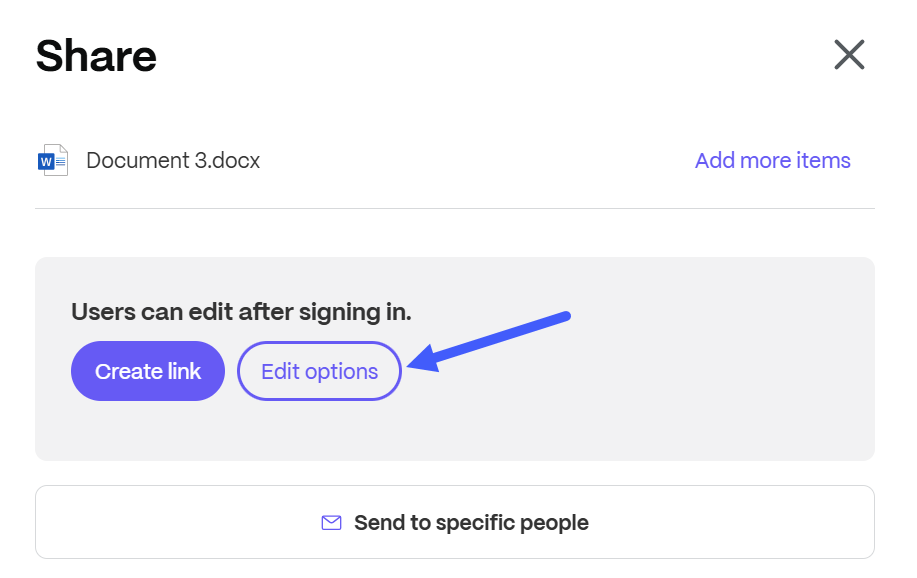
Select Edit options for the link.
-
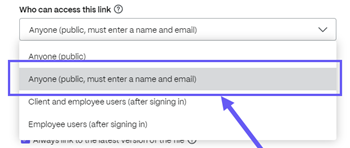
Under Who can access this link: select Client contacts and employee users (after signing in).
-
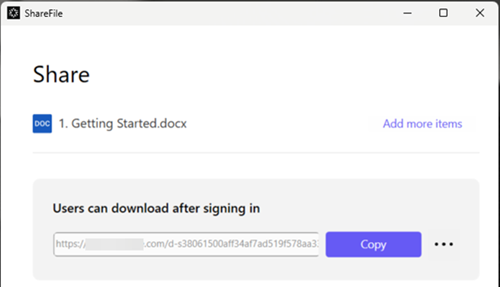
Select Create and copy. The Link copied to your clipboard message displays briefly.
-
Use the copied link to share with your email or another communication app.
-
Once the recipient accesses the shared file, navigate to People > Browse client contacts and select the recipients name.
-
Under the Basic Information tab you can enter additional information about the client.
-
Select Save Changes.
-
Select the client again then select Email Login Information from the Actions > User-level right-hand side menu to open the Resend Welcome Emails screen to let the user know they’ve been added to the account.
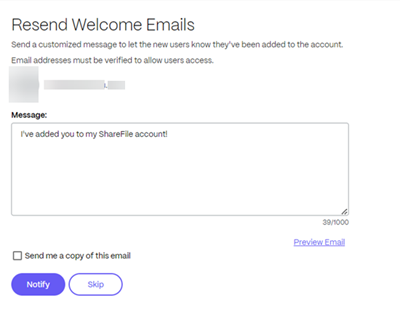
Note:
If you select Send me a copy of this email the copy you receive does not include the Activate Account option.
-
Select Notify.
The “Invitation(s) sent successfully” message displays briefly and the Browse client contacts dashboard screen displays allowing you to review the added client.
The recipient receives a message asking them to activate their account.
Create a client by adding them to a folder
You can create a new client by adding a new user to an existing folder in your ShareFile account. Use the following steps to complete the process by adding a new user to a folder.
-
In your ShareFile account, open the folder you want to add a new user to.
-
Select People and click Add People to Folder.
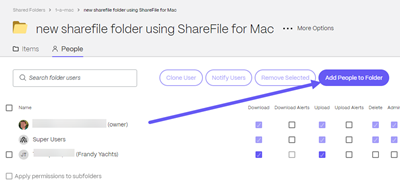
The Add People to Folder pop-up displays.
-
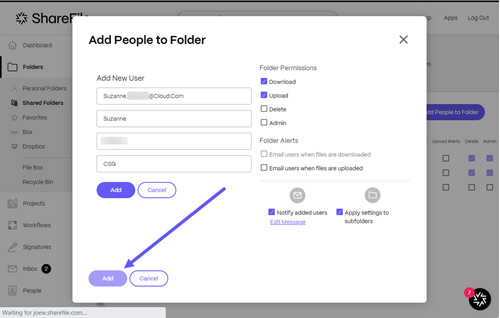
Select Create New User.
-
Enter the new user information including the required fields for Email Address, First Name, and Last Name. Company is optional.
-
Set the Folder Permissions.
-
Select Notify added users to ensure the new client is notified and can receive an activation link.
-
Use the option to Apply settings to subfolders if necessary.
-
Select Add.
The “People added successfully” message displays briefly.
-
Navigate to People > Browse client contacts and select the person you added to the folder.
-
Under the Basic Information tab you can enter additional information about the client.
-
Select Save Changes.
-
Select the client again then select Email Login Information from the Actions > User-level right-hand side menu to open the Resend Welcome Emails screen to let the user know they’ve been added to the account.
-
Select Notify. The “Invitation(s) sent successfully” message displays briefly and the Browse client contacts dashboard screen displays allowing you to review the added client.
The recipient receives a message asking them to activate their account.
Resend a client user activation email
If you need to resend an existing client user an activation email, you will need the permission to Manage Clients and client contacts.
To resend the welcome email containing the activation link:
-
In ShareFile, navigate to People > Browse client contacts.
-
Search or select the clients name.
-
Select the clients name or the manage icon to open the clients page.
-
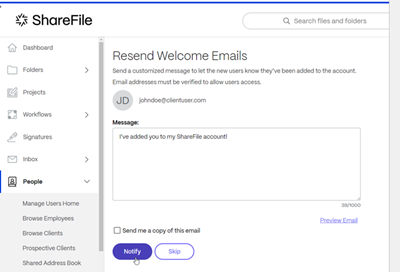
Under Actions - User-level select Email Login Information.
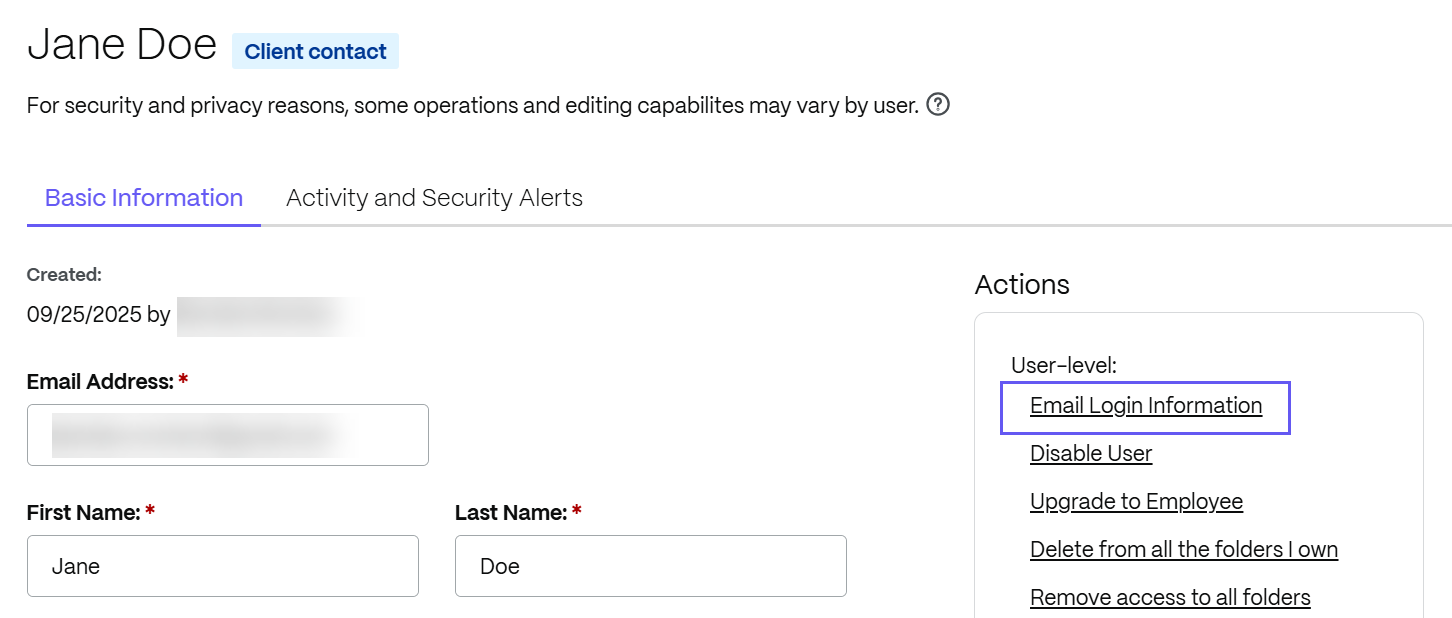
The Resend Welcome Emails screen displays witht he client name pre-populated.
-
Customize your email message as needed.
-
Select Notify.
Send a client contact a password reset email
-
In ShareFile, navigate to People > Browse client contacts.
-
Search or select the clients name.
-
Select the clients name or the manage icon to open the clients page.
-
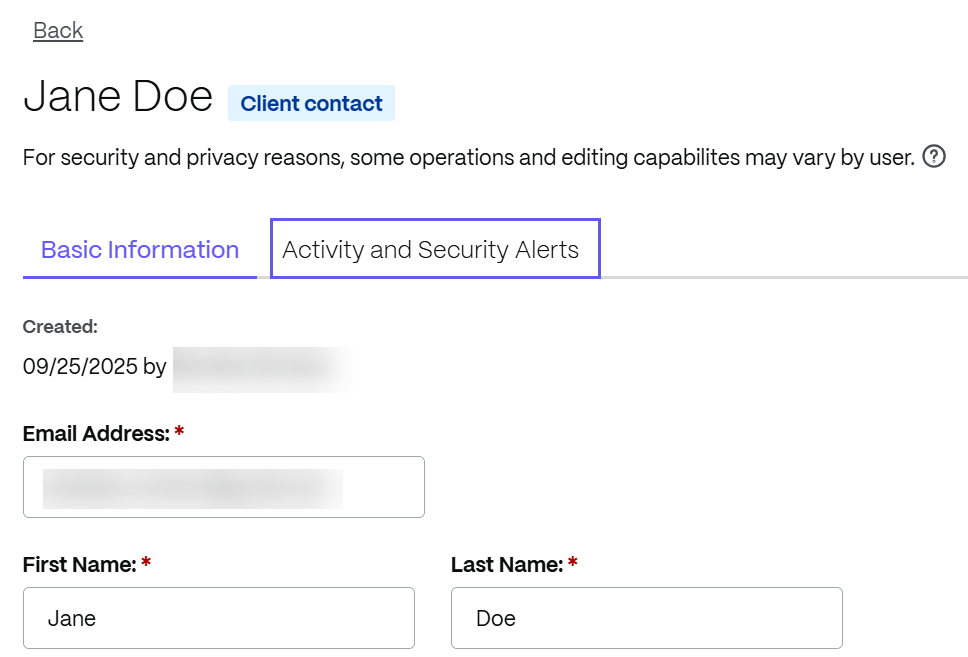
Select Activity and Security Alerts.
-
Under Account access select Reset Password.
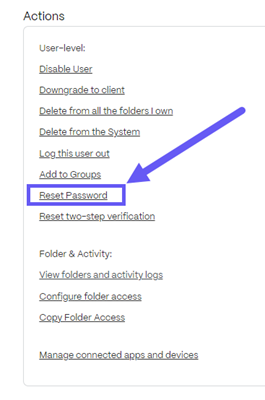
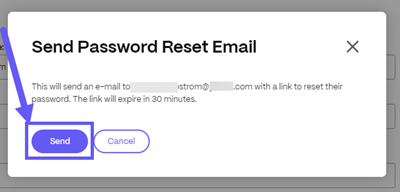
The Send Password Reset Email popup displays.
-
Select Send.
Edit client contacts
To edit a client contact:
-
Sign into ShareFile.
-
Navigate to People > Browse client contacts.
-
Select the manage icon next to the listed client you want to update.
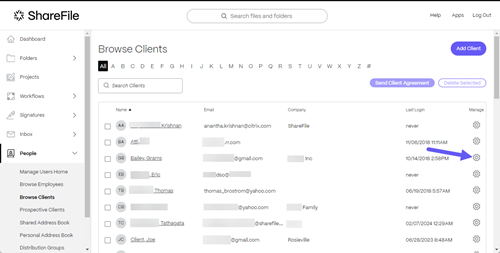
You can:
- Edit the client contact basic information such as their Email Address, First Name, Last Name, Company, Phone, Address, Country, City/Town,State/Province/Region and Postal/Zip Code.
- Change the notifications frequency and default email language.
- Reset their password.
- Take user-level and folder & activity actions.
- Manage client sessions
- View users activity and security alerts.
-
Once edits are done, select Save Changes.
Note:
For security and privacy reasons, some operations and editing capabilites may vary by user. Your editing capabilities may be restricted based on some or all of these criteria:
- Whether the users have logged into the system at least once.
- Whether you are an administrator on the account.
- Whether the user is an employee or client.
Delete a client
Note:
To delete Clients, the Employee user needs both the manage clients and manage employees permissions enabled.
Use the following intructions to delete a client.
-
Sign into ShareFile.
-
Navigate to People > Browse client contacts.
-
Select the manage icon next to the listed client you want to delete.

The client screen displays.
-
Under Actions select Delete from the System.
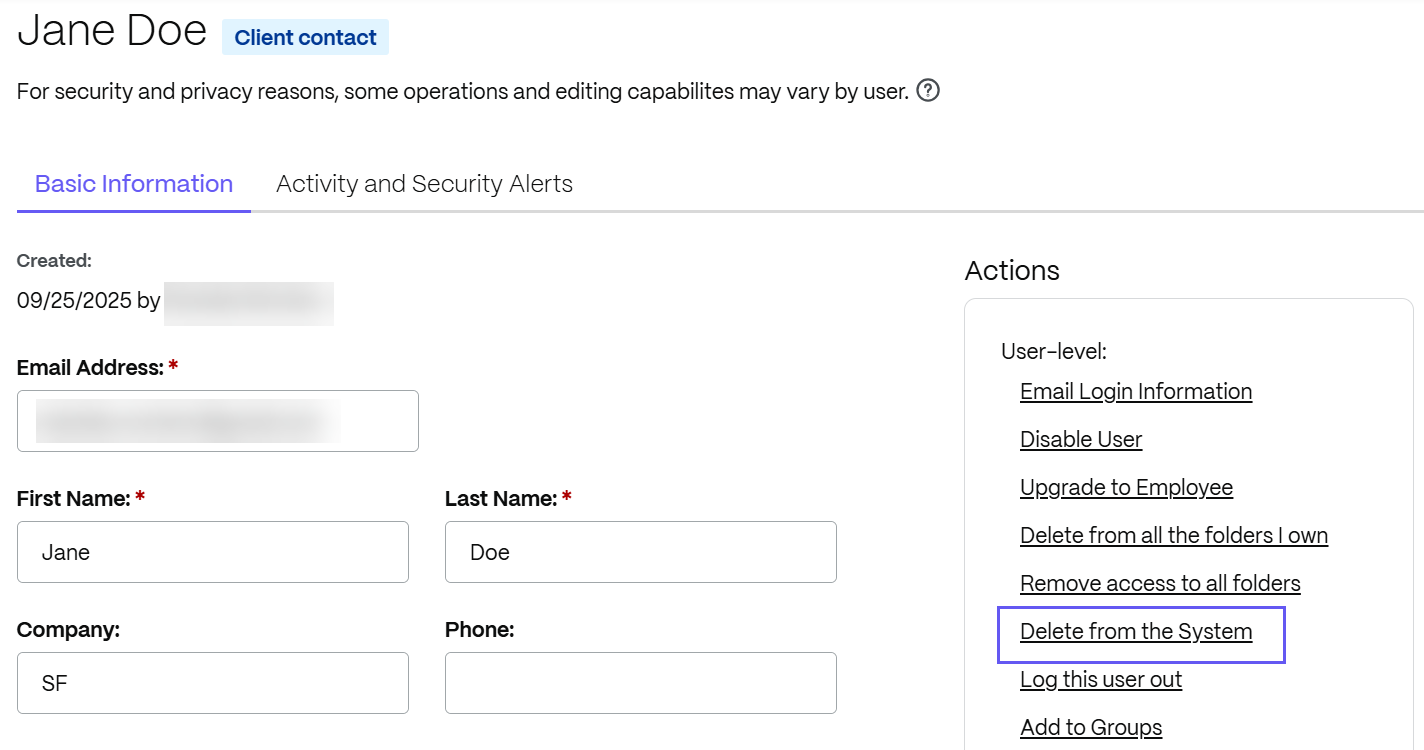
The Remove Client confirmation screen displays.
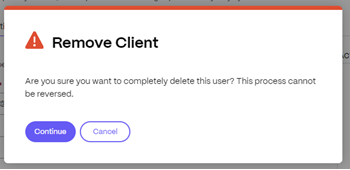
-
Select Continue. The confirmation banner displays briefly and the client is deleted from the system.
Share
Share
This Preview product documentation is Citrix Confidential.
You agree to hold this documentation confidential pursuant to the terms of your Citrix Beta/Tech Preview Agreement.
The development, release and timing of any features or functionality described in the Preview documentation remains at our sole discretion and are subject to change without notice or consultation.
The documentation is for informational purposes only and is not a commitment, promise or legal obligation to deliver any material, code or functionality and should not be relied upon in making Citrix product purchase decisions.
If you do not agree, select I DO NOT AGREE to exit.