This content has been machine translated dynamically.
Dieser Inhalt ist eine maschinelle Übersetzung, die dynamisch erstellt wurde. (Haftungsausschluss)
Cet article a été traduit automatiquement de manière dynamique. (Clause de non responsabilité)
Este artículo lo ha traducido una máquina de forma dinámica. (Aviso legal)
此内容已经过机器动态翻译。 放弃
このコンテンツは動的に機械翻訳されています。免責事項
이 콘텐츠는 동적으로 기계 번역되었습니다. 책임 부인
Este texto foi traduzido automaticamente. (Aviso legal)
Questo contenuto è stato tradotto dinamicamente con traduzione automatica.(Esclusione di responsabilità))
This article has been machine translated.
Dieser Artikel wurde maschinell übersetzt. (Haftungsausschluss)
Ce article a été traduit automatiquement. (Clause de non responsabilité)
Este artículo ha sido traducido automáticamente. (Aviso legal)
この記事は機械翻訳されています.免責事項
이 기사는 기계 번역되었습니다.책임 부인
Este artigo foi traduzido automaticamente.(Aviso legal)
这篇文章已经过机器翻译.放弃
Questo articolo è stato tradotto automaticamente.(Esclusione di responsabilità))
Translation failed!
Content Collaboration single sign-on configuration guide for dual identity providers
This document helps with the configuration of utilizing both Citrix Endpoint Management and Active Directory Federated Services (ADFS) as the Identity Provider (IdP) for a single Content Collaboration account. The resulting configuration allows the token signing certificate on the ADFS server to be the same as the SAML certificate on the Citrix Endpoint Management server. This provides a single Citrix Content Collaboration account to:
- Use Citrix Endpoint Management as the IdP for MDX-wrapped apps. Providing a true single sign-on (SSO) experience from a mobile device using ShareFile MDX applications.
- Use ADFS as the SAML IdP for SSO to webapps.
Prerequisites
- Citrix Endpoint Management 10.x server with fully functioning single sign-on for MDX configured to the Citrix Content Collaboration account.
- ADFS installed and configured within the infrastructure.
- Access to an administrator account within Citrix Content Collaboration with the ability to configure single sign-on.
Preparing the ADFS Token Signing Certificate
When configuring ADFS for SSO to Citrix Content Collaboration, it is required to upload the ADFS token signing certificate to the Citrix Content Collaboration control panel without the private key. ADFS generates a self-signed certificate to be used for token signing and token decrypting with a 1-year expiration. However, the self-signed certificate does contain a private key.
At the one-year mark, the self-signed certificate is renewed using Automatic Certificate Rollover 15 days before expiration and becomes the primary certificate. This causes all existing SSO trust relationships to fail. For this configuration, the SAML certification from the Citrix Endpoint Management console is exported with an expiration of 3 years. The certificate validity period is customizable and mitigates the need to renew the token signing certificate at the 1-year mark.
Generate the SAML certificate
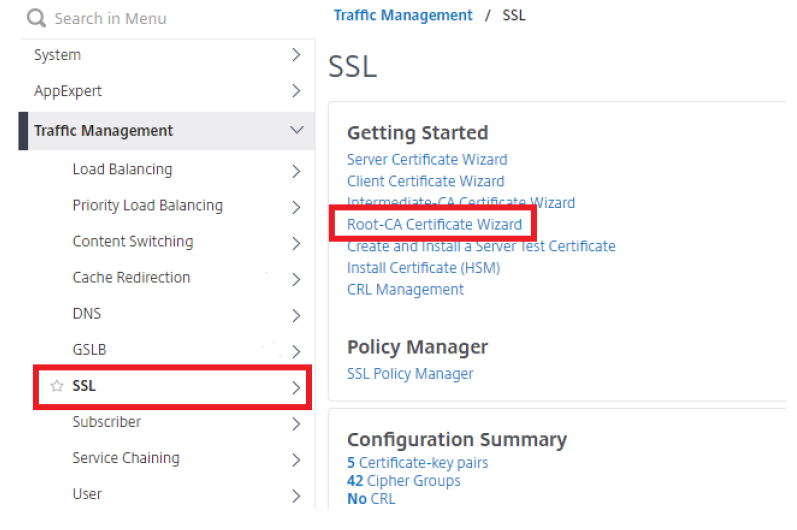
- Sign in to the Citrix Gateway GUI.
- Navigate to Traffic Management > SSL.
-
Under Getting Started section, select Root-CA Certificate Wizard.
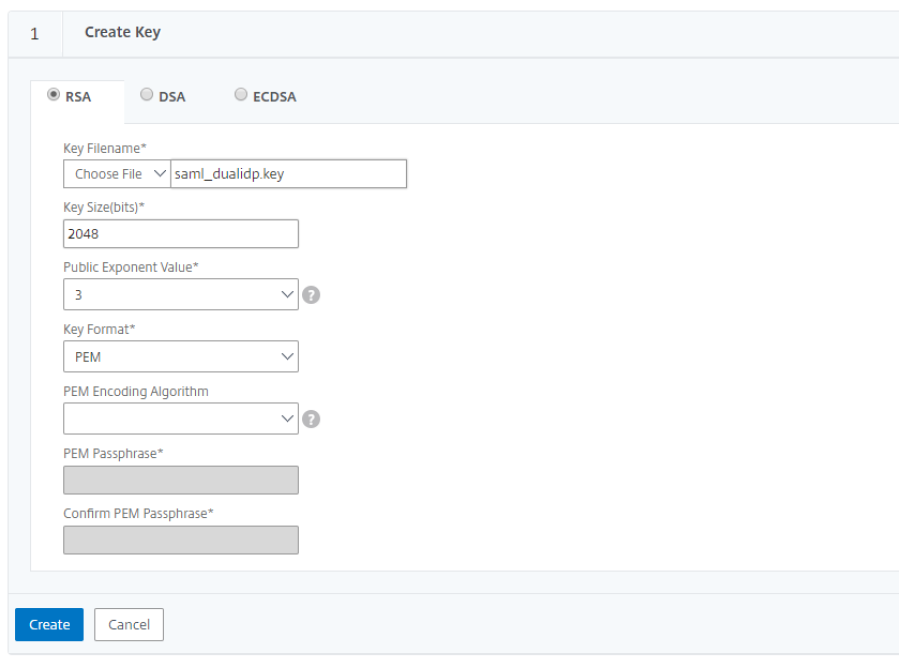
You are now prompted to create the private key.
- In the Key Filename field, provide a name for your key.
- Key Size, 2048.
- Public Exponent Value, 3.
-
Click Create to create the key.
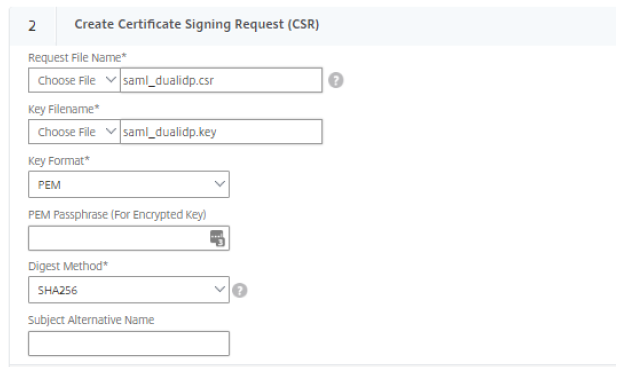
The next step is to create the Certificate Signing Request (CSR).
- In the Request File Name field, enter a name for the CSR.
- The Key Filename and PEM format are pre-populated.
- Set Digest Method to SHA256.
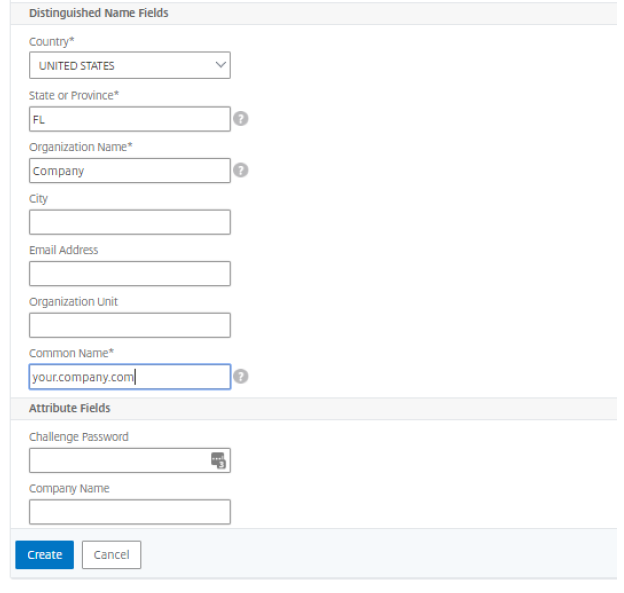
- In Distinguished Name Fields, provide information about your organization.
- In Attribute Fields, a Challenge Password is not needed. However, the Company Name can be added.
-
Click Create to complete the CSR Request.
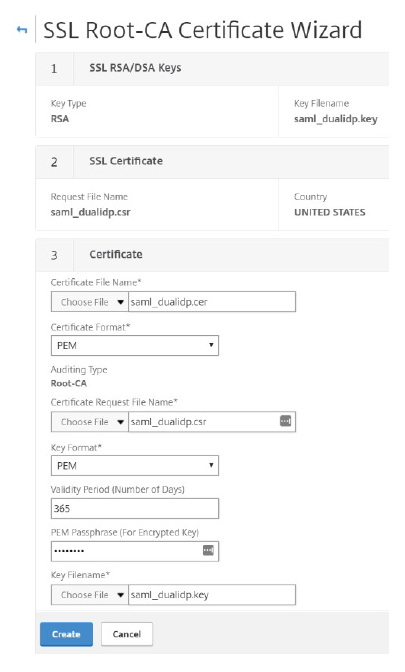
The final step is to create the SAML certificate.
- In the Certificate File Name field, enter the name of your certificate.
- The Certificate Format is pre-populated with PEM.
- The Certificate Request File Name reflects the CSR you created in the previous step.
- The Key Format defaults to PEM.
- Specify the Validity Period (in days) you want the certificate to be valid for. In this example, the created certificate is a 3 year certificate, so enter 1095.
- The Key Filename is pre-populated from the first step.
-
Click Create to create the certificate.
- After creating the certificate, you can exit the Wizard as you do not need to install the certificate on Citrix Gateway.
- Click Cancel and click YES to confirm you would like to return back to the main SSL GUI screen.
Export the SAML certificate
You now need to export the newly created certificate and key off Citrix Gateway for use on the Citrix Endpoint Management server and on ADFS. For Citrix Endpoint Management, you need the saml_dualidp.cer file and saml_dualidp.key file created in the previous steps, as the cert and key are already properly formatted for Citrix Endpoint Management. Follow the steps to save the files to a location we can then use to upload them to your Citrix Endpoint Management server when replacing its built-in SAML certificate.
- In Citrix Gateway, under Traffic Management > SSL, under Tools, click Manage Certificates / Keys / CSRs.
-
From the Manage Certificates page, click Date Modified, which brings the newest files to the top. You now see the 3 newly created files from the previous steps. If you do not see them, you can show more than 25 items per page.

- Select the saml_dualidp.cer file and choose Download. Save to a location of your choice.
- Follow the previous step for the saml_dualidp.key file.
- Click Back to return to the previous page.
Next, export the certificate and key in a file format that the ADFS server understands.
- Under the same Tools section as earlier, select the option to Export PKCS#12.
- In the Choose File field, enter saml_dualidp.pfx.
- In the Certificate File Name field, select Choose File, Date Modified, and select the saml_dualidp.cer file. Click Open.
- In the Key Filename field, select Choose File, Date Modified, and select the saml_dualidp.key file. Click Open.
- Provide an Export Password.
- Provide the PEM Passphrase.
- Click OK to finish the export.
Now you need to copy the .pfx file off Citrix Gateway and onto a network location.
- From the Tools menu once again, select the option to Manage Certificates / Keys / CSRs.
- Select the newly created saml_dualidp.pfx file, and choose Download.
- Save the file somewhere locally accessible.
- Close the windows in Citrix Gateway.
The SAML certificate creation process is complete.
Upload newly created token signing certificate to ADFS
The first step is to disable certificate rollover on the ADFS server.
- Create a remote connection to your ADFS server.
- By default, ADFS enables AutoCertificateRollover to renew the self-signed certificate at the 1-year mark. This feature must be disabled to upload the newly created token signing certificate.
- Run PowerShell as Administrator on the ADFS server.
- Type:
Get-ADFSProperties. - To disable AutoCertificateRollover:
Set-ADFSProperties -AutoCertificateRollover $false
You need to then import the previously exported saml_dualidp.pfx file onto the ADFS server so we can use it as the token signing certificate.
- On the ADFS server, right-click, Start > Click Run > Type mmc, and select enter to open a Snap-in.
- Click File > Add/Remove Snap-in.
- From the available snap-ins section, select Certificates, then click Add.
- Select Computer Account, click Next.
- Select Local Computer and then Finish, click OK.
- Under Console Root, Expand Certificates > Personal > Certificates.
- Right-click the Certificates folder and select All Tasks > Import.
- From the Welcome screen, click Next.
- Browse to the saml_dualidp.pfx file you saved earlier, click Open.
- Select Next, type the password for the private key, select Next again.
- Select Place all certificates in the following store, Personal and click Next.
- Click Finish to complete the import and close the MMC Snap-in.
Now you need to change the token signing certificate in ADFS.
- On the ADFS server, from the Server Manager Dashboard, select Tools > ADFS Management.
- On the left hand side of the ADFS Management Console, expand Service > Certificates.
- Under the Actions menu, select Add Token-Signing Certificate, and select the newly imported token signing certificate.
- The newly added token signing certificate is added as a secondary certificate. You must make it the primary.
- Expand Service and then select Certificates.
- Click the Secondary token signing certificate.
- In the Actions pane on the right, select Set As Primary. Click Yes at the confirmation prompt.
Citrix Endpoint Management configuration
To use the same certificate on Citrix Endpoint Management, you only need to perform two actions.
Backup Citrix Endpoint Management SAML certificate
- Sign into the Citrix Endpoint Management server, click the gear icon towards the top right, then under Settings, select Certificates.
- Highlight the SAML certificate, then click Export.
- Choose to also export the private key, then click OK.
- Store the certificate in a safe location.
Install new SAML certificate
- Sign into the Citrix Endpoint Management server, click the gear icon, then under Settings click Certificates.
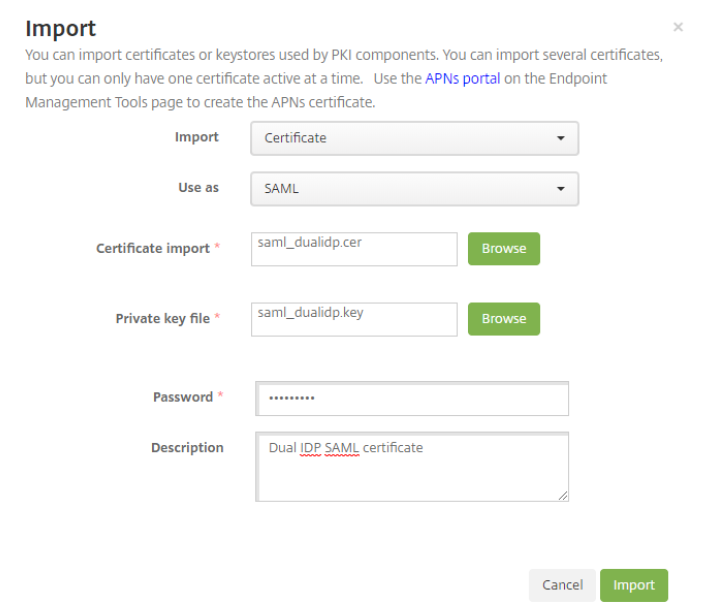
- Click Import, then select the following options:
- Import: Certificate
- Use as: SAML
- Certificate import: Browse your workstation or network for the previously exported saml_dualidp.cer file.
- Private key file: Browse your workstation for the previously exported saml_dualidp.key file.
- Password: enter the password for the private key.
- Description: enter enough detail for others to know its function.
-
Click Import to complete.
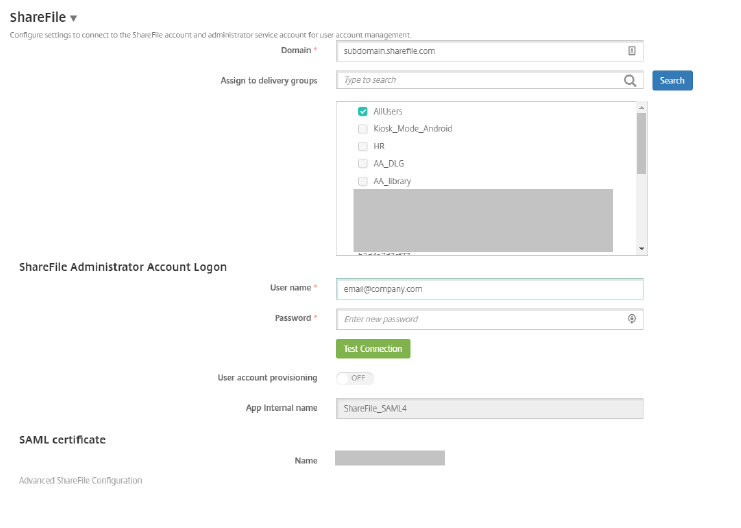
- On the Citrix Endpoint Management server, click Configure, then ShareFile.
- If you have a previous configuration, click Save on the bottom right of the screen. This step updates the Citrix Content Collaboration account with the X.509 certificate that has been created in the previous steps. It also overrides the current SSO configuration settings, which are changed in the steps outlined in the next section.
- If Citrix Content Collaboration has not yet been configured, in the Domain field, enter your Citrix Content Collaboration account.
- Select a delivery group that has access to the ShareFile MDX application.
- Provide your Citrix Content Collaboration user name. This is a local administrative user account.
- Enter the Citrix Content Collaboration password (not your Active Directory password).
- Leave User account provisioning OFF (especially if you are using the User Management Tool).
-
Click Save to complete the Citrix Content Collaboration configuration on Citrix Endpoint Management.
Citrix Content Collaboration single sign-on configuration check
Once both Citrix Endpoint Management and ADFS have been configured for ShareFile, follow the steps below to validate the SSO settings.
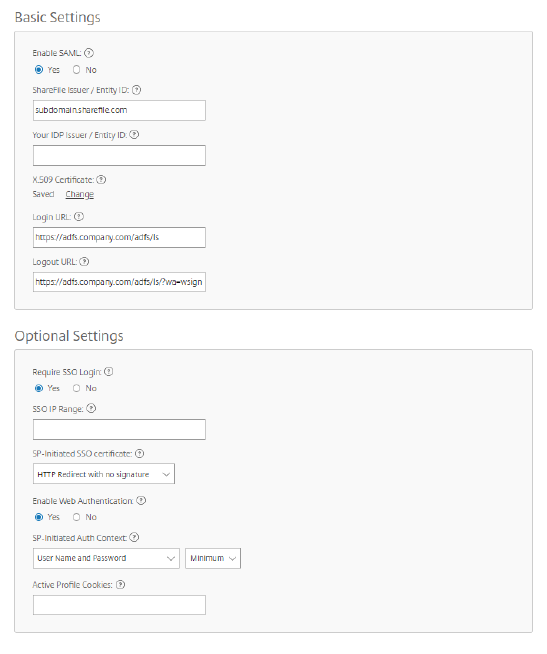
- Sign into your Citrix Content Collaboration account using the web UI, click Admin, then Configure Single Sign-on page.
- Issuer/Entity ID: this needs to be identical to the Identifier Name within the ADFS configuration.
-
Login URL: Login URL to ADFS (example:
https://adfs.company.com/adfs/ls). -
Logout URL: Logout URL to ADFS (example:
https://adfs.company.com/adfs/ls/?wa=wsignout1.0). This needs to be added as a logout point on ADFS, if not done so already. - Enable Web Authentication: Yes
-
SP-Initiated Auth Context: Select the option User Name and Password for Forms Authentication, or Integrated Authentication (according to what your ADFS server is configured with).
Testing
Re-enroll your device to Citrix Endpoint Management, download the app and check if MDX SSO is working. You can also perform testing using SP initiated authentication: https://[subdomain].sharefile.com/saml/login.
In this article
This Preview product documentation is Citrix Confidential.
You agree to hold this documentation confidential pursuant to the terms of your Citrix Beta/Tech Preview Agreement.
The development, release and timing of any features or functionality described in the Preview documentation remains at our sole discretion and are subject to change without notice or consultation.
The documentation is for informational purposes only and is not a commitment, promise or legal obligation to deliver any material, code or functionality and should not be relied upon in making Citrix product purchase decisions.
If you do not agree, select I DO NOT AGREE to exit.