This content has been machine translated dynamically.
Dieser Inhalt ist eine maschinelle Übersetzung, die dynamisch erstellt wurde. (Haftungsausschluss)
Cet article a été traduit automatiquement de manière dynamique. (Clause de non responsabilité)
Este artículo lo ha traducido una máquina de forma dinámica. (Aviso legal)
此内容已经过机器动态翻译。 放弃
このコンテンツは動的に機械翻訳されています。免責事項
이 콘텐츠는 동적으로 기계 번역되었습니다. 책임 부인
Este texto foi traduzido automaticamente. (Aviso legal)
Questo contenuto è stato tradotto dinamicamente con traduzione automatica.(Esclusione di responsabilità))
This article has been machine translated.
Dieser Artikel wurde maschinell übersetzt. (Haftungsausschluss)
Ce article a été traduit automatiquement. (Clause de non responsabilité)
Este artículo ha sido traducido automáticamente. (Aviso legal)
この記事は機械翻訳されています.免責事項
이 기사는 기계 번역되었습니다.책임 부인
Este artigo foi traduzido automaticamente.(Aviso legal)
这篇文章已经过机器翻译.放弃
Questo articolo è stato tradotto automaticamente.(Esclusione di responsabilità))
Translation failed!
Social sign in
Administrators can choose to enable a social sign-in provider on the account that client contacts can leverage.
By using social sign in functionality, clients can use their existing social accounts that have been made available for them to authenticate into a ShareFile account, eliminating the need to create and remember yet another set of login credentials.
For more information on Client end user configuration, see ShareFile Social sign in.
Notes:
- Be aware that existing users on the account who are leveraging a disabled social sign in option might need to go through a reactivation process to set up an available authentication method if they don’t already have an alternative authentication method configured.
- Upon the user’s next log-in, the user is sent a reactivation email for their account to set up an authentication that is enabled for them.
Enable social sign in
To enable social sign in:
- From the ShareFile dashboard, navigate to Settings > Admin Settings > Security > Sign In policy > Social sign in.
- Click Edit.
-
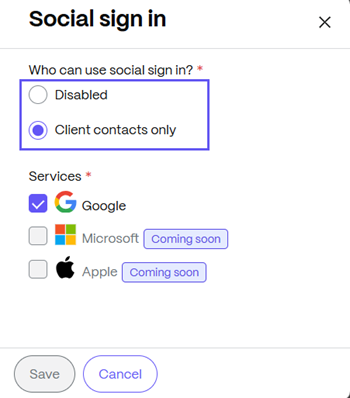
Select who can use social sign in. Choose from Disabled or Client contacts only and check the box next to the service you want to enable:

- Click Save.
Once enabled, this allows client users to start configuring the social sign in options that have a checkmark beside them.
Disable social sign in
To disable social sign in:
- From the ShareFile dashboard, navigate to Settings > Admin Settings > Security > Sign In policy > Social sign in.
- Click Edit.
- Uncheck the box next to the service you want to disable.
- Click Save.
Share
Share
In this article
This Preview product documentation is Citrix Confidential.
You agree to hold this documentation confidential pursuant to the terms of your Citrix Beta/Tech Preview Agreement.
The development, release and timing of any features or functionality described in the Preview documentation remains at our sole discretion and are subject to change without notice or consultation.
The documentation is for informational purposes only and is not a commitment, promise or legal obligation to deliver any material, code or functionality and should not be relied upon in making Citrix product purchase decisions.
If you do not agree, select I DO NOT AGREE to exit.